Category Archives: Manuals

  • 0

manual de manejo de washington dc en español

Category : Manuals

The Washington DC Driver’s Manual in Spanish is a vital resource for Hispanic drivers, providing essential information on traffic laws, safe driving practices, and road signs.

Overview of the Manual

The Washington DC Driver’s Manual in Spanish is a comprehensive guide designed to assist Spanish-speaking drivers in understanding local traffic laws, road safety, and licensing requirements. It covers essential topics such as general rules of the road, defensive driving techniques, and the meaning of traffic signs. The manual also provides detailed information on obtaining a driver’s license, including eligibility criteria and the application process. Additionally, it offers study tips and practice questions to help prepare for the knowledge test. This resource is freely available online, making it accessible to all Hispanic drivers in Washington DC. It serves as a crucial tool for ensuring safe and responsible driving practices.

Importance of Spanish-Language Resources for Hispanic Drivers

Spanish-language driving resources, such as the Washington DC Driver’s Manual in Spanish, are indispensable for Hispanic drivers, ensuring they can access critical information in their native language. This promotes equal opportunities for understanding traffic laws, road signs, and licensing processes. By providing a Spanish version, Washington DC supports inclusivity and safety, enabling Hispanic drivers to prepare effectively for exams and navigate roads confidently. Such resources help bridge language gaps, fostering a safer and more informed driving community. They also reflect the district’s commitment to serving its diverse population, ensuring that all drivers, regardless of language, can adhere to traffic regulations and contribute to road safety.

Understanding Traffic Laws in Washington DC

The Washington DC Driver’s Manual in Spanish outlines essential traffic laws, including rules of the road, speed limits, and right-of-way regulations, ensuring safe driving practices.

General Rules of the Road

The Washington DC Driver’s Manual in Spanish details fundamental traffic rules to ensure safety and order on the road. Key points include obeying speed limits (typically 30-55 mph), understanding right-of-way rules at intersections, and adhering to stop signs and traffic lights. Drivers must always wear seatbelts, and passengers under 16 require proper restraints. Handheld device usage is prohibited while driving. Lane changes require clear signaling, and merging vehicles must yield to traffic already on the main road. Pedestrians always have the right-of-way in crosswalks, and vehicles must stop at least 10 feet away from a pedestrian. These rules are essential for safe and responsible driving in Washington DC.

Specific Regulations for Spanish-Speaking Drivers

The Washington DC Driver’s Manual in Spanish addresses specific needs of Hispanic drivers, ensuring accessibility to essential driving information. It clarifies requirements for non-English speakers, such as the ability to read and understand traffic signs in Spanish. Drivers must provide valid identification and proof of residency, regardless of language proficiency. The manual also outlines the process for obtaining a driver’s license, including vision tests, written exams, and road skills assessments. Additionally, it highlights resources like bilingual forms and interpreter services available at DC DMV offices. These provisions aim to make the licensing process inclusive and equitable for Spanish-speaking residents.

Safe Driving Practices

The Washington DC Driver’s Manual in Spanish emphasizes defensive driving techniques, such as staying alert, maintaining safe distances, and avoiding distractions like using a phone while driving.

Defensive Driving Techniques

The Washington DC Driver’s Manual in Spanish highlights defensive driving techniques as essential for road safety. These include maintaining a safe distance, avoiding distractions like using a phone, and staying alert to surroundings. Drivers are encouraged to anticipate the actions of other road users and adjust their speed accordingly. Additionally, the manual emphasizes the importance of being prepared for unexpected situations, such as sudden stops or pedestrians stepping into the road. By adopting these practices, drivers can significantly reduce the risk of accidents and ensure a safer driving environment for themselves and others on Washington DC’s roads; Regular vehicle maintenance is also stressed to prevent mechanical failures that could lead to dangerous situations.

Common Hazards and How to Avoid Them

The Washington DC Driver’s Manual in Spanish identifies common hazards, such as aggressive driving, distracted driving, and poor weather conditions. To stay safe, drivers should remain alert and maintain a safe distance from other vehicles. Pedestrian-heavy areas require extra caution, as do cyclists sharing the road. Additionally, the manual advises being prepared for unexpected emergencies, such as a vehicle malfunction or a sudden stop by another driver. By staying vigilant and following defensive driving techniques, drivers can minimize risks and avoid accidents. Regular vehicle maintenance is also emphasized to prevent breakdowns that could lead to hazardous situations on the road.
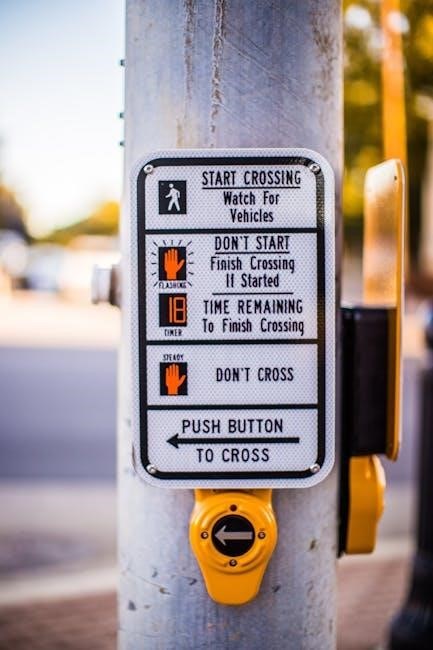
Signs and Signals

The Washington DC Driver’s Manual in Spanish provides essential information on traffic signs and signals, helping drivers understand visual cues for safe navigation. Recognizing these is crucial for adhering to traffic laws and ensuring road safety.

Understanding Traffic Signs in Spanish

The Washington DC Driver’s Manual in Spanish includes detailed explanations of traffic signs, ensuring Spanish-speaking drivers can interpret them correctly. These signs are categorized into regulatory, warning, and guide signs. Regulatory signs, such as stop signs (ALTO) and speed limits, indicate specific laws. Warning signs alert drivers to potential hazards, like curves or pedestrian crossings. Guide signs provide directional information, helping drivers navigate roads effectively. Understanding these signs is crucial for safe driving and complying with traffic laws. The manual also includes visual examples, making it easier for learners to recognize and comprehend traffic signals. This section ensures that Hispanic drivers can confidently interpret and respond to road signage in Washington DC.

Hand Signals and Their Meanings

The Washington DC Driver’s Manual in Spanish explains the importance of hand signals for clear communication on the road. Drivers must use these signals to indicate their intentions, such as turning or stopping. The left arm straight out indicates a left turn, while the arm bent upward signals a right turn. Extending the arm downward means slowing or stopping. These gestures are standardized and universally recognized, ensuring safety and clarity for all road users. Understanding and using hand signals correctly is essential for safe driving practices and legal compliance. The manual emphasizes their role in preventing accidents and maintaining smooth traffic flow in Washington DC.

Obtaining a Driver’s License in Washington DC

The Washington DC Driver’s Manual in Spanish guides applicants through the process of obtaining a driver’s license, outlining eligibility requirements and necessary documentation.

Eligibility Requirements

To obtain a driver’s license in Washington DC, applicants must meet specific eligibility criteria. Individuals must be at least 16 years old to apply for a learner’s permit, with parental consent required for those under 18. Applicants must provide valid proof of identity, residency, and legal presence in the U.S. A vision test is mandatory, and first-time applicants must complete a driver’s education course if under 18. Additionally, applicants must pass a knowledge test and a road skills test. The Spanish-language manual outlines these requirements in detail, ensuring clarity for Hispanic applicants. All documentation and fees must be submitted to the DC DMV to proceed with the licensing process.

Application Process for a Spanish-Speaking Applicant

The application process for Spanish-speaking applicants in Washington DC is streamlined to ensure accessibility. Applicants must first obtain the Spanish-language driver’s manual to study for the knowledge test; They are required to gather necessary documents, such as proof of identity, residency, and legal presence in the U.S. A vision test is mandatory, and applicants under 18 must provide parental consent. The process includes completing a knowledge test and a road skills test. Spanish-speaking applicants can request bilingual support during testing. All documents and fees must be submitted to the DC DMV office. The manual provides detailed instructions to guide applicants through each step efficiently.

Preparing for the Knowledge Test

The Spanish-language driver’s manual is essential for preparing for the knowledge test. It covers traffic laws, road signs, and safe driving practices in Washington DC.

Study Tips for the Spanish-Language Exam

The Spanish-language driver’s manual is a free resource provided by the Washington DC DMV. It covers essential topics such as traffic laws, road signs, and safe driving practices. To prepare effectively, focus on understanding key sections like general rules of the road and specific regulations. Practice with sample questions and online resources to familiarize yourself with the exam format. Review the manual thoroughly, highlighting important information. Dedicate time to studying defensive driving techniques and common hazards. Utilize flashcards or summaries to reinforce your knowledge. By following these study tips, you can confidently prepare for the knowledge test and become a responsible driver in Washington DC.

Practice Questions and Resources

To effectively prepare for the Spanish-language driver’s exam, utilize the practice questions provided in the Washington DC DMV manual. These questions cover essential topics such as traffic laws, road signs, and safe driving practices. Additionally, the DC DMV offers online resources and practice exams in Spanish to help applicants familiarize themselves with the test format. Take advantage of flashcards or summaries to reinforce key concepts. Many community centers and libraries also provide free study materials in Spanish. By regularly practicing with these resources, you can improve your knowledge and confidence, ensuring a successful exam experience and becoming a responsible driver in Washington DC.


  • 0

seiki television manual

Category : Manuals

Seiki television manuals are comprehensive guides providing detailed instructions for installation, operation, and maintenance. They include safety information, troubleshooting tips, and feature explanations, ensuring optimal TV performance and longevity.

1.1 Overview of Seiki Television Manuals

Seiki television manuals provide comprehensive guides for setting up, operating, and maintaining your TV. They include detailed instructions for connecting devices, navigating menus, and troubleshooting common issues. Available in PDF format, these manuals cover features like HD technology, smart TV capabilities, and parental controls. Popular models such as SE32HY and SE40FYT have dedicated guides. Manuals are accessible online, ensuring easy reference for optimal TV performance and user satisfaction.

1.2 Importance of Reading the Manual

Reading the Seiki television manual is essential for understanding your TV’s features, ensuring proper setup, and resolving issues quickly. It provides safety precautions, warranty details, and troubleshooting tips, enhancing your viewing experience. Manuals also guide firmware updates and parental controls, helping you maximize your TV’s potential. Regularly consulting the manual ensures optimal performance and prevents potential damage, making it a crucial resource for all users.

Popular Seiki Television Models and Their Manuals

Popular Seiki TV models like SE32HY, SE50UY04EC, and SE40FYT offer detailed manuals for easy setup and troubleshooting. These guides ensure optimal performance and user satisfaction.

2.1 Seiki SE32HY Manual

The Seiki SE32HY manual provides detailed instructions for setting up and operating this 32-inch HD LED television. It covers installation steps, picture and sound settings, and connectivity options. The manual also includes troubleshooting guides for common issues like no signal or connectivity problems. Additionally, it explains how to access built-in apps and streaming services, ensuring a seamless viewing experience. Regular firmware updates are recommended for optimal performance.

2.2 Seiki SE50UY04EC Manual

The Seiki SE50UY04EC manual offers detailed guidance for this 50-inch Ultra HD smart television. It covers initial setup, picture settings, and connectivity options. The manual also explains how to use smart TV features, access streaming services, and troubleshoot common issues. Additionally, it provides instructions for updating firmware and customizing viewing experiences, ensuring users maximize their TV’s capabilities.

2.3 Seiki SE40FYT Manual

The Seiki SE40FYT manual provides essential instructions for this 40-inch LED television. It details installation steps, connectivity options, and picture settings. The guide also covers troubleshooting common issues, updating firmware, and accessing built-in apps. With clear instructions for parental controls and energy-saving features, the manual ensures users can optimize their viewing experience and maintain their TV’s performance efficiently.

Setting Up Your Seiki Television

Setting up your Seiki TV involves connecting devices, configuring basic settings, and navigating the menu. Follow the manual for a smooth installation and optimal viewing experience.

3.1 Connecting Devices to Your Seiki TV

Connecting devices to your Seiki TV is straightforward with its multiple HDMI, AV, and USB ports. Use HDMI for HD devices like Blu-ray players and gaming consoles. AV inputs support older equipment, while USB ports allow media playback. Refer to the manual for step-by-step guidance on cable connections and configuration. Ensure proper connections for optimal picture and sound quality, enabling seamless streaming and entertainment experiences.

3.2 Initial Configuration and Setup

Initial setup involves connecting devices, navigating menus, and configuring settings. Use the remote to select input sources, adjust picture and sound settings, and set up network connections for smart features. Refer to the manual for step-by-step instructions on first-time installation, language selection, and parental controls. Proper configuration ensures seamless functionality and personalized viewing experiences tailored to your preferences.

Features and Technologies in Seiki TVs

Seiki TVs offer advanced features like HD displays, smart technology, and customizable settings, ensuring a superior viewing experience with enhanced clarity and user-friendly navigation options.

4.1 High Definition (HD) Technology

Seiki TVs feature High Definition (HD) technology, delivering crisp and clear visuals with vibrant colors. HD technology enhances picture quality, ensuring detailed and lifelike images for an immersive viewing experience.

With HD, viewers can enjoy sharper textures, better contrast, and reduced blur, making it ideal for movies, sports, and gaming. HD technology is a cornerstone of Seiki TVs, providing a premium visual experience.

4.2 Smart TV Features

Seiki Smart TVs offer a wide range of features, including built-in apps for streaming services like Netflix, YouTube, and more. They support wireless connectivity, allowing seamless integration with other devices. Voice control and multi-device control enhance user convenience. These features provide a modern, interactive viewing experience, making Seiki Smart TVs a hub for entertainment and connectivity in any home.

4.3 Picture and Sound Settings

Seiki TVs offer customizable picture settings, including HD resolution, contrast, and color adjustments, ensuring a vivid viewing experience. Advanced sound settings provide options like surround sound, equalizer modes, and volume leveling. Users can easily navigate these settings via the on-screen menu to optimize their entertainment experience, tailoring visuals and audio to personal preferences for enhanced enjoyment of movies, shows, and games.

Troubleshooting Common Issues

Troubleshooting common issues with your Seiki TV involves addressing problems like “No Signal or No Picture” and connectivity problems. Refer to the manual for step-by-step solutions.

5.1 No Signal or No Picture

If your Seiki TV displays “No Signal” or shows no picture, check all connections and ensure the correct input is selected. Verify antenna or cable connections, and restart the TV. If issues persist, reset the TV to factory settings or update firmware. Consult the manual for detailed troubleshooting steps to resolve display problems effectively.

5.2 Connectivity Problems

Connectivity issues with your Seiki TV can often be resolved by restarting the TV and connected devices. Check HDMI and Wi-Fi connections, ensuring cables are secure and networks are stable. Reset network settings or update firmware if problems persist. For wireless issues, restart your router and ensure the TV is connected to the correct network. Consult the manual for advanced troubleshooting steps to restore connectivity.

5.3 Firmware Updates

Firmware updates enhance your Seiki TV’s performance, adding new features and fixing issues. To update, go to the TV’s settings menu, select “Support” or “System Update,” and choose “Check for Updates.” Follow on-screen instructions to download and install the latest version. Ensure the TV is connected to the internet and avoid turning it off during the update. Refer to the manual for model-specific instructions and troubleshooting tips.

5.4 Remote Control Issues

Remote control issues can disrupt your viewing experience; If your Seiki TV remote isn’t working, check for low battery, physical obstructions, or interference from other devices. Replace batteries, ensure line of sight, and restart the TV. If problems persist, reset the remote by removing batteries for 30 seconds. For syncing issues, refer to the manual or contact customer support for assistance or replacement options.

Safety and Maintenance

Proper handling, avoiding liquid exposure, and safe disposal are crucial. Regular cleaning and updating firmware ensure optimal performance and longevity of your Seiki TV.

6.1 Important Safety Instructions

Always read the manual before using your Seiki TV. Avoid exposing the device to liquids or extreme temperatures. Ensure proper ventilation to prevent overheating. Never attempt to open or modify the television, as this can cause damage or injury. Follow all safety guidelines to ensure reliable operation and longevity of your device.

6.2 Care and Maintenance Tips

Regularly clean the TV screen with a soft, dry cloth to prevent dust buildup. Avoid placing objects on the screen to prevent scratches. Ensure proper ventilation to avoid overheating. Avoid exposing the TV to extreme temperatures or moisture. Unplug the device before cleaning to ensure safety. Follow these tips to maintain optimal performance and extend the lifespan of your Seiki television.

Customer Support and Resources

Seiki offers official resources and online platforms for user manuals, guides, and troubleshooting. Visit ManualsLib or Manuals.co.uk for detailed support. Contact customer service directly for further assistance.

7.1 Contacting Seiki Customer Service

For assistance with your Seiki television, contact customer service through their official website or support platforms. Online resources like ManualsLib and Manuals.co.uk provide access to user manuals and troubleshooting guides. For specific issues, such as firmware updates or technical support, reach out directly to Seiki’s customer service team for personalized help and solutions.

7.2 Online Resources and Communities

Online platforms like ManualsLib and Manuals.co.uk offer free access to Seiki TV manuals, guides, and troubleshooting tips. These resources provide detailed instructions, firmware updates, and user forums for sharing experiences. Visit the official Seiki website or trusted manual databases to download PDF manuals for models like SE32HY and SE50UY04EC, ensuring you have the latest support for your television.

Parental Controls

Seiki TV manuals guide users on setting up parental controls to restrict content, ensuring safe viewing for children. The manual explains how to manage these settings effectively.

8.1 Setting Up Parental Controls

To set up parental controls on your Seiki TV, access the settings menu and navigate to the parental controls section. Create a PIN for security, then block specific channels or content based on ratings. Adjust settings to restrict access to mature themes or inappropriate content. Refer to the manual for detailed steps to ensure safe viewing for children and maintain control over TV usage.

8.2 Managing Parental Control Settings

After setting up parental controls, you can manage settings by accessing the menu with your PIN. Edit restricted channels, update content ratings, or adjust time limits. Regularly review and update settings to ensure they align with your preferences. Reset or change your PIN for added security. Monitor usage logs to track viewed content and make necessary adjustments for a safer viewing environment.

Firmware Updates

Firmware updates enhance your Seiki TV’s performance, security, and functionality. Regular updates ensure you have the latest features, bug fixes, and improvements for optimal viewing experience.

9.1 Checking for Firmware Updates

To check for firmware updates on your Seiki TV, navigate to the Settings menu, select System or Software Update, and choose Check for Updates. The TV will automatically search for available updates. If an update is found, follow the on-screen instructions to download and install it. Ensure your TV is connected to the internet during this process. Regularly checking for updates ensures optimal performance and security.

9.2 Installing Firmware Updates

Once a firmware update is available, select Install Update to begin the process. The TV will download and install the update automatically. Ensure the TV remains on and connected to power throughout the process. Do not turn off the TV or disconnect it from the power source, as this may cause permanent damage. After installation, the TV will restart to apply the update. A confirmation message will appear once the update is successfully completed.

Additional Features

Seiki TVs offer built-in apps for popular streaming services like Netflix and YouTube. Customize your viewing experience with adjustable picture and sound settings for enhanced entertainment.

10.1 Built-in Apps and Streaming Services

Seiki TVs come with built-in apps for popular streaming services like Netflix, YouTube, and VUDU. These apps allow seamless access to a wide range of content directly on your TV. The user-friendly interface enables easy navigation and streaming capabilities, enhancing your entertainment experience. The manual provides step-by-step instructions to set up and use these features, ensuring you can enjoy your favorite shows and movies effortlessly.

10.2 Customizing Your Viewing Experience

Seiki TVs offer customization options to tailor your viewing experience. Adjust picture settings for brightness, contrast, and color, and select from preset modes like Movie or Sport. The manual guides you through setting up favorite channels and organizing them for quick access. Additionally, you can personalize sound settings to enhance dialogue clarity or optimize for surround sound, ensuring a tailored entertainment experience for all preferences.

This concludes our guide to Seiki TV manuals. By following the instructions, you can ensure optimal performance, enhance your viewing experience, and maintain your device effectively.

11.1 Summary of Key Points

This guide has covered essential aspects of Seiki television manuals, including setup, features, troubleshooting, and maintenance. It emphasized the importance of reading manuals for optimal performance and highlighted resources like online communities and customer support for resolving issues. By following these guidelines, users can enhance their viewing experience and ensure longevity of their Seiki TV.

11.2 Final Tips for Using Your Seiki TV

Regularly update firmware for optimal performance and new features. Explore built-in apps for enhanced entertainment. Adjust picture and sound settings to your preference. Use parental controls to manage content access. Refer to the manual for troubleshooting common issues. Maintain your TV by cleaning and updating software. Always use original accessories for safety and compatibility. Enjoy your viewing experience with these practical tips.


  • 0

insignia tv manual

Category : Manuals

Welcome to the Insignia TV manual! This guide helps you understand your TV’s features, setup, and troubleshooting. Explore 4K UHD, smart capabilities, and more.

1.1 Understanding the Purpose of the Manual

This manual is designed to help you maximize your Insignia TV experience. It provides detailed guidance on installation, features, and troubleshooting. Whether you’re setting up your TV for the first time or exploring advanced settings, this guide ensures you understand every function. From basic operations to smart features, it covers everything you need to know to enjoy your Insignia TV to the fullest. Use it to resolve issues, customize settings, and make the most of your viewing experience.

1.2 Key Features of the Insignia TV

The Insignia TV offers a range of advanced features, including 4K Ultra HD resolution, HDR for enhanced picture quality, and built-in Fire TV for seamless streaming. It comes with a voice remote powered by Alexa, allowing voice control and easy access to apps. The TV also supports smart home integration and compatibility with universal remotes. Designed for a modern viewing experience, it combines cutting-edge technology with user-friendly interfaces to deliver stunning visuals and intuitive functionality.

System Requirements and Compatibility

The Insignia TV supports 4K UHD resolution, HDR, and Fire TV Edition, ensuring compatibility with modern devices and wireless standards for a seamless entertainment experience.

2.1 Supported Devices and Connections

The Insignia TV supports a wide range of devices, including HDMI-compatible devices, USB drives, and wireless peripherals. It is compatible with modern streaming services and smart home systems. The TV features multiple HDMI ports, USB ports, and wireless connectivity options like Wi-Fi and Bluetooth. It also supports Ethernet for stable internet connections. Ensure your devices meet the TV’s compatibility standards for optimal performance and seamless integration with its advanced features.

2.2 Software and Firmware Requirements

Ensure your Insignia TV runs on the latest software and firmware for optimal performance. The TV operates on Fire TV OS, offering a seamless smart experience. Regular updates enhance functionality and security. Use the settings menu to check for and install updates. A stable internet connection is required for updates. The TV is compatible with various streaming services and smart home devices. Always verify that your external devices meet the TV’s software requirements for smooth operation.

Setting Up Your Insignia TV

Setting up your Insignia TV involves unboxing, installing, and configuring the device. Follow the guide for connecting external devices and completing the initial setup process smoothly.

3.1 Unboxing and Physical Installation

Unboxing your Insignia TV involves carefully removing it from the packaging and preparing for installation. Ensure the TV is handled with care to avoid damage. Check for all included accessories, such as the remote control, power cord, and stand. If using a wall mount, remove the stands and attach the mounting bracket according to the VESA specifications. For tabletop installation, assemble the stands following the provided instructions. Ensure the TV is placed on a stable surface to prevent tipping. Once installed, proceed to connect devices and complete the setup process.

3.2 Connecting External Devices and Accessories

Connect external devices like Blu-ray players, gaming consoles, and soundbars using HDMI ports. Use the HDMI ARC port for seamless audio connectivity to soundbars or home theaters. Ensure all cables are securely plugged into the correct ports. For wired internet, connect an Ethernet cable to the TV’s Ethernet port. Pair external accessories like wireless headphones or speakers via Bluetooth settings. Refer to the manual for specific port locations and compatibility guidelines. Power on devices and navigate to the TV’s input menu to select the connected device.

3.3 Initial Setup and Configuration

Turn on your Insignia TV and follow the on-screen instructions for initial setup. Select your preferred language and country/region. Connect to Wi-Fi or use an Ethernet cable for internet access. The TV will guide you through registering your device and setting up parental controls. Ensure automatic software updates are enabled for optimal performance. Complete the first-time setup wizard to customize settings like display preferences and app installations. Refer to the manual for detailed steps to finalize your TV’s configuration and ensure all features are properly activated.

Operating the Insignia TV

Learn to operate your Insignia TV with ease. Use the remote control, navigate menus, and access smart features. Customize settings and enjoy seamless entertainment with intuitive controls.

4.1 Using the Remote Control

The Insignia TV remote control offers convenient navigation and voice command options. Use the Voice Remote with Alexa for hands-free control, or utilize the traditional buttons for menu navigation. The remote includes shortcuts for popular apps, volume control, and power management. For universal compatibility, refer to the remote control codes in the user guide. Ensure batteries are properly installed for optimal performance. Troubleshoot connectivity issues by syncing the remote with your TV. Explore advanced features like voice search for enhanced viewing experiences.

4.2 Navigating the Menu and Settings

Navigate the Insignia TV menu with ease using the remote or voice commands. Access settings by pressing the Home button and selecting the gear icon. Customize display, sound, and system preferences. Use voice search to find apps or content quickly. Parental controls and app management options are available for a personalized experience. Refer to the manual for detailed instructions on advanced settings and troubleshooting menu-related issues. Explore features like screen mirroring and HDMI management for enhanced connectivity.

4.3 Accessing Smart Features and Apps

The Insignia TV offers seamless access to smart features and apps through the Fire TV experience. Use the voice remote with Alexa to launch apps, search content, or control playback. Download apps from the Amazon Appstore, including popular services like Netflix, Hulu, and more. Organize your favorites on the home screen for quick access. The TV also supports multi-device control, allowing you to manage compatible devices with a single remote or voice commands for a streamlined entertainment experience.

Troubleshooting Common Issues

Resolve connectivity, picture, and sound issues by restarting the TV, checking cables, or updating software. Refer to the manual for detailed solutions and diagnostic steps.

5.1 Resolving Connectivity Problems

Experiencing connectivity issues? Check your Wi-Fi network or Ethernet cable connections. Restart your router and ensure stable internet. For HDMI problems, try a different port or replace the cable. If no signal is detected, verify the input source matches your device. Ensure all cables are securely connected. Resetting the TV to factory settings may also resolve connectivity glitches. Refer to the manual for detailed troubleshooting steps to restore your TV’s functionality and enjoy uninterrupted viewing.

5.2 Addressing Picture and Sound Quality Issues

If you notice blurry pictures or poor sound, check your display settings. Adjust brightness, contrast, and color balance for optimal clarity. Ensure HDR is enabled for 4K content. For audio issues, verify volume levels and speaker settings. Check HDMI connections and ensure cables are secure. If problems persist, reset the TV to factory settings or update software. Refer to the manual for detailed calibration guides to enhance your viewing experience and resolve any visual or auditory distortions effectively.

5.3 Fixing Software and Firmware Glitches

If your Insignia TV experiences software or firmware issues, start by restarting the device. Check for firmware updates in the settings menu and install the latest version. If apps malfunction, clear cached data or reinstall them. For persistent glitches, perform a factory reset via the settings. Ensure your TV is connected to the internet for updates. If issues remain, contact Insignia support for assistance. Regular updates and proper maintenance can prevent future software-related problems.

Customizing Your Viewing Experience

Adjust display settings, sound preferences, and parental controls to tailor your viewing experience. Explore advanced options like picture modes and audio enhancements for optimal enjoyment of your Insignia TV.

6.1 Adjusting Display Settings

The Insignia TV allows you to customize your display settings for an optimal viewing experience. Adjust brightness, contrast, and color balance to suit your preferences. Access the Picture Settings menu to fine-tune options like backlight, sharpness, and color temperature. Enable features like HDR for enhanced clarity and vibrant colors. Use the preset picture modes, such as Movie, Game, or Sports, to optimize the display for different content types. Additionally, explore advanced settings like local dimming and motion interpolation for smoother visuals. Personalize your viewing experience with tailored display configurations.

6.2 Setting Up Parental Controls

Enhance safety and control with the Insignia TV’s parental controls. Navigate to the Settings menu and select Parental Controls. Create a PIN to restrict access to mature content. Block specific channels or apps and set viewing time limits. Customize content restrictions based on ratings. Enable child-friendly modes to ensure safe browsing. These features help protect minors from inappropriate material and provide peace of mind for parents. Configure these settings to align with your household’s preferences and ensure a secure viewing environment for all users.

6.3 Exploring Advanced Viewing Options

Discover advanced features to elevate your viewing experience. Adjust settings like HDR, color calibration, and motion smoothing for optimal picture quality. Enable Dolby Atmos for immersive audio. Customize viewing modes, such as Cinema, Sports, or Gaming, to suit your content. Explore multi-device control and voice command options for seamless integration. These advanced settings allow you to personalize your experience, ensuring every moment on your Insignia TV is tailored to your preferences for unparalleled entertainment.

Maintenance and Care

Regular maintenance ensures your Insignia TV’s longevity. Clean the screen gently with a soft cloth and avoid harsh chemicals. Check for software updates and install them promptly to keep your TV running smoothly. Proper care extends the life of your device and maintains optimal performance.

7.1 Cleaning the TV Screen

To maintain your Insignia TV’s display quality, clean the screen regularly. Use a soft, dry cloth to wipe away dust and fingerprints. Avoid harsh chemicals, abrasive materials, or excessive moisture, as they may damage the screen. For stubborn smudges, lightly dampen the cloth with distilled water, but ensure it is not soaking wet. Gently wipe in a circular motion, starting from the center and moving outward. Never spray cleaning solutions directly onto the screen to prevent damage. Regular cleaning preserves clarity and longevity.

7.2 Updating Software and Firmware

Regular software and firmware updates are essential for optimal performance and security. To update your Insignia TV, ensure it is connected to the internet. Navigate to the Settings menu, select System, and then System Update. Choose Check Now to find and install available updates. Allow the TV to restart and complete the update process. For manual updates, visit the Insignia support website, download the latest firmware, and follow on-screen instructions. Always use the latest firmware to ensure compatibility and enhanced features.

7.3 Ensuring Longevity of the Device

Proper care ensures your Insignia TV lasts longer. Regularly clean the screen with a soft cloth and avoid harsh chemicals. Keep the TV away from direct sunlight and moisture to prevent damage. Ensure good ventilation to avoid overheating. Use a surge protector to safeguard against power fluctuations. Follow the user manual’s guidelines for wall mounting and setup. Avoid extreme temperatures and physical stress. By maintaining these practices, you can enjoy optimal performance and extend the lifespan of your Insignia TV.

Legal and Warranty Information

Understand your TV’s warranty terms, compliance with safety regulations, and legal notices. Ensure proper usage as per guidelines to maintain warranty validity and avoid legal issues.

8.1 Understanding the Warranty Terms

Your Insignia TV is covered under a limited one-year warranty. This warranty covers manufacturing defects in materials and workmanship. For detailed terms, refer to the warranty section in your user manual or visit the Insignia website. Proper registration and adherence to usage guidelines are essential to maintain warranty validity. Any unauthorized modifications or misuse may void the warranty. Contact Insignia support for claims or further assistance.

8.2 Compliance with Safety Regulations

Your Insignia TV is designed to meet international safety standards. Always follow the safety precautions outlined in the manual to avoid accidents. Ensure proper handling and placement of the TV to prevent tipping. Use only approved mounting hardware and follow installation guidelines. Adhere to local electrical regulations and energy efficiency standards. Regularly inspect cords and connections for damage. By complying with these guidelines, you ensure safe and optimal performance of your Insignia TV.


vortex venom manual

Category : Manuals

The Vortex Venom Red Dot Sight is a compact, lightweight optic designed for quick target acquisition and precision․ Its rugged construction ensures durability in harsh conditions, making it ideal for tactical and competitive shooting applications․ This manual provides detailed guidance on operating, maintaining, and troubleshooting the Venom Red Dot Sight, helping users maximize its performance and longevity․ The sight features a 3 MOA dot, anti-reflective coatings, and waterproof design, ensuring clarity and reliability in various environments․ Understanding the manual is key to unlocking the full potential of this versatile optic․

1․1 Overview of the Vortex Venom Red Dot Sight

The Vortex Venom Red Dot Sight is a compact, lightweight optic designed for rapid target acquisition and precision․ It features a 3 MOA or 6 MOA dot reticle, anti-reflective lens coatings, and ArmorTek protection for durability․ The sight is O-ring sealed for waterproof performance and built with shockproof construction, making it reliable in harsh environments․ Its sleek design and robust features cater to tactical, competitive, and recreational shooters, ensuring versatility and performance․

1․2 Importance of the Manual for Optimal Use

The manual is essential for understanding the Venom’s features, operation modes, and maintenance․ It guides users through brightness adjustments, battery management, and troubleshooting․ Proper use ensures optimal performance, longevity, and safety․ Reading the manual helps users maximize the sight’s potential, customize settings, and resolve common issues, making it a vital resource for both beginners and experienced shooters․

Key Features of the Vortex Venom Red Dot Sight

The Vortex Venom Red Dot Sight features a 3 MOA dot for quick target acquisition, anti-reflective coatings, ArmorTek protection, O-ring sealed waterproofing, and shockproof construction for durability․

2․1 3 MOA Dot Diameter for Quick Target Acquisition

The Vortex Venom’s 3 MOA dot diameter is optimized for rapid target engagement, offering a balance between precision and visibility․ Its small size allows for accurate aiming without obstructing the field of view, making it ideal for close-quarters shooting and precision applications․ The dot’s clarity and definition ensure quick target acquisition in various lighting conditions, enhancing overall shooting performance․

2․2 Anti-Reflective Lens Coating for Brighter Views

The Vortex Venom features an anti-reflective lens coating that minimizes glare and reduces light reflection, ensuring brighter and clearer views․ This coating enhances light transmission and contrast, allowing users to maintain target visibility even in challenging lighting conditions․ The result is a sharper, more defined sight picture, which is critical for precision and accuracy in both competitive and tactical environments․

2․3 ArmorTek Protection for Exterior Lenses

The Vortex Venom’s exterior lenses are protected by ArmorTek, a proprietary coating that safeguards against scratches, oil, dirt, and harsh cleaning chemicals․ This durable coating ensures the lenses remain clear and unobstructed, maintaining optimal optical performance even in rugged conditions․ ArmorTek enhances the sight’s reliability and longevity, providing peace of mind for users in demanding environments․

2․4 O-Ring Sealed Waterproof Performance

The Vortex Venom Red Dot Sight features O-ring sealed construction, ensuring waterproof performance in wet or submerged conditions․ This robust sealing prevents moisture ingress, protecting internal components and maintaining optical clarity․ Whether in rain, sweat, or immersion, the sight remains reliable, delivering consistent performance in challenging environments․ This feature enhances durability and ensures the optic withstands harsh weather conditions effortlessly․

2․5 Shockproof Construction for Durability

The Vortex Venom Red Dot Sight boasts a shockproof design, built to withstand heavy recoil and harsh impacts․ Its rugged aluminum housing ensures durability, while the sight’s internal components remain secure under stress․ Rigorous testing guarantees reliability in tactical and high-stress environments, making it a dependable choice for handguns, rifles, or shotguns․ This feature ensures the sight performs flawlessly even in the toughest conditions․

Operating Modes of the Vortex Venom

The Vortex Venom features two operating modes: Auto and Manual․ Auto mode adjusts brightness based on ambient light, while Manual mode offers custom control․ The sight can be easily switched between modes to suit different lighting conditions, ensuring optimal performance in various environments․

3․1 Auto Mode: Ambient Light Adaptation

Auto mode automatically adjusts the red dot’s brightness based on surrounding light conditions, ensuring optimal visibility․ In low light, the dot dims, while in bright environments, it brightens․ This feature enhances battery life by adapting to ambient light, eliminating manual adjustments․ The sight powers down after 14 hours of inactivity to conserve energy, extending battery life up to 3,000 hours on lower settings․

3․2 Manual Mode: Custom Brightness Control

Manual mode allows users to manually adjust the red dot’s brightness using the up and down buttons, offering 10 distinct brightness levels․ This mode does not automatically power down, ensuring constant visibility․ It is ideal for specific environments where consistent brightness is preferred, providing shooters with precise control to suit their shooting conditions and preferences for optimal accuracy․

Brightness Adjustments and Battery Life

The Vortex Venom Red Dot Sight offers 10 adjustable brightness levels in Manual mode and up to 3,000 hours of battery life on lower settings, ensuring reliable performance in various lighting conditions without frequent battery replacements․

4․1 10 Levels of Brightness in Manual Mode

The Vortex Venom Red Dot Sight features 10 adjustable brightness levels in Manual mode, allowing users to customize visibility according to lighting conditions․ Controlled via the up and down buttons, this setting ensures optimal dot intensity without auto-shutoff, providing consistent performance for precise targeting in various environments․ This feature enhances versatility and user control, catering to different shooting scenarios and preferences․

4․2 Battery Life: Up to 3,000 Hours on Lower Settings

The Vortex Venom Red Dot Sight offers an impressive battery life of up to 3,000 hours when used on lower brightness settings; This extended runtime ensures reliable performance in the field without frequent replacements․ Designed for efficiency, the sight balances power consumption with optimal visibility, providing users with a dependable optic for extended shooting sessions or tactical operations․ This feature enhances its durability and practicality for real-world applications․

Reticle and Magnification Options

The Vortex Venom offers 3 MOA and 6 MOA dot options for precise targeting․ The magnification adjustment ring allows users to customize power for varying shooting scenarios, ensuring versatility and accuracy in both close-quarters and long-range engagements․

5․1 3 MOA and 6 MOA Dot Options

The Vortex Venom Red Dot Sight offers two reticle options: a 3 MOA dot for precision and a 6 MOA dot for rapid target acquisition․ The 3 MOA dot is ideal for long-range accuracy, while the 6 MOA dot excels in close-quarters and fast-moving scenarios․ Users can choose the size that best suits their shooting style and environment, ensuring optimal performance in various conditions․ This versatility makes the Venom adaptable to both tactical and competitive applications, providing shooters with a reliable and efficient aiming solution․

5․2 Magnification Adjustment Ring for Variable Power

The Magnification Adjustment Ring on the Vortex Venom allows users to easily change the scope’s power, adapting to different shooting scenarios․ By rotating the ring, shooters can adjust the magnification to suit their needs, from close-range to long-distance targets․ This feature ensures quick and precise adjustments, enhancing versatility and performance in both tactical and hunting environments, making the Venom a reliable choice for various applications․

Installation and Mounting

The Vortex Venom Red Dot Sight is designed for secure mounting on Weaver/Picatinny rails․ Ensure proper alignment and torque specifications for a stable, zero-shift installation․ Follow manufacturer guidelines for optimal performance and reliability․

6․1 Weaver/Picatinny Mount Compatibility

The Vortex Venom Red Dot Sight is designed for seamless compatibility with Weaver/Picatinny mounts, ensuring secure and stable installation on various firearms․ Its lightweight, durable construction allows for easy mounting without compromising the sight’s performance․ The Weaver/Picatinny system provides a universal mounting solution, enabling quick attachment to rifles, shotguns, or pistols with compatible rails․ Proper torque specifications ensure a secure fit, preventing shifting during use․ This compatibility enhances versatility, making the Venom Red Dot Sight adaptable to multiple platforms for tactical or hunting applications․ Always follow the manufacturer’s guidelines for optimal installation and performance․

6․2 Step-by-Step Mounting Instructions

Mounting the Vortex Venom Red Dot Sight involves securing it to a Weaver/Picatinny rail․ Start by ensuring the rail is clean and free of debris․ Attach the sight by aligning the mounting hardware with the rail slots․ Tighten the screws evenly in a star pattern to the torque specification provided in the manual․ Avoid over-tightening to prevent damage․ Once securely mounted, adjust the sight’s position for proper eye alignment and level it using the built-in features․ Finally, test the sight by aiming at a fixed target to ensure stability and accuracy․ Proper mounting ensures optimal performance and reliability in the field․

Maintenance and Care

Regularly clean the exterior lenses with a soft cloth and mild soap․ Avoid harsh chemicals or abrasive materials that may scratch the surfaces․ Store the sight in a protective case when not in use to prevent dust and moisture exposure․ Check for loose mounting hardware periodically to ensure stability and accuracy․

7․1 Cleaning the Exterior Lenses

Use a soft, lint-free cloth to wipe away dirt and smudges from the lenses․ For stubborn marks, dampen the cloth with mild soap and water, but avoid harsh chemicals or abrasive materials․ Regular cleaning ensures optimal clarity and performance․ Avoid touching the lens surfaces to prevent oil residue․ Store the sight in a protective case when not in use to minimize dust exposure․

7․2 Protecting the Sight from Scratches and Dirt

Use lens covers to shield the sight from dust and debris when not in use․ Avoid exposing the optic to harsh chemicals or abrasive materials․ The ArmorTek coating provides scratch resistance, but additional care ensures longevity․ Store the sight in a protective case to prevent accidental damage․ Regular inspections and proper handling further safeguard against wear and tear․

Troubleshooting Common Issues

Common issues include the red dot not turning on or visibility problems․ Check battery connections, ensure lenses are clean, and verify auto/manual mode settings․ Restarting the sight or consulting the manual often resolves these issues quickly․

8․1 Red Dot Not Turning On

If the red dot fails to turn on, first check the battery to ensure it’s properly installed and not depleted․ Verify that the sight is in the correct mode (Auto or Manual)․ In Auto mode, the dot may turn off after 14 hours; expose it to light to reactivate․ In Manual mode, ensure the brightness is adjusted using the up/down buttons․ Clean the lenses to maintain optimal performance․

8․2 Red Dot Visibility Problems

If the red dot appears dim or invisible, check the brightness setting in Manual mode or ensure Auto mode is functioning․ Clean the lenses with a soft cloth to remove dirt or oil․ Verify that the sight is not in power-saving mode, especially in low-light conditions․ If issues persist, consult the troubleshooting guide or contact Vortex customer support for assistance․

Warranty and Support

The Vortex Venom is backed by the VIP Warranty, offering unlimited, hassle-free coverage․ For inquiries or issues, contact Vortex customer service for prompt assistance․

9․1 VIP Warranty Coverage

The Vortex Venom Red Dot Sight is protected by the VIP Warranty, providing unlimited, no-questions-asked coverage for the life of the product․ This comprehensive warranty ensures that any defects or damages are repaired or replaced free of charge, offering peace of mind to users․ The VIP Warranty underscores Vortex’s commitment to quality and customer satisfaction․

9․2 Contacting Vortex Customer Service

For assistance with your Vortex Venom Red Dot Sight, contact Vortex Customer Service at service@vortexoptics․com or call 1-800-426-0048․ Visit their website at vortexoptics;com for support resources, warranty claims, or product inquiries․ Their knowledgeable team is available to address any questions or concerns, ensuring a prompt and effective resolution to your needs․

User Manual Summary

The Vortex Venom manual provides a comprehensive guide to setup, operation, and maintenance․ It covers brightness controls, reticle options, and troubleshooting tips, ensuring optimal performance․ The manual also outlines the VIP warranty, offering assurance and support for users․

10․1 Key Instructions for First-Time Users

For first-time users, start by familiarizing yourself with the Vortex Venom’s controls and features․ Mount the sight on a Weaver/Picatinny rail, ensuring secure installation․ Insert the battery, and adjust the brightness using the up/down buttons․ In Auto mode, the dot adapts to ambient light, while Manual mode offers custom brightness control․ Align the 3 MOA dot with your target for quick acquisition․ Always refer to the manual for troubleshooting and maintenance tips to ensure optimal performance and longevity of the sight․

10․2 Advanced Features and Settings

The Vortex Venom offers advanced features like 10 brightness levels in Manual mode, allowing precise control for various lighting conditions․ Users can switch between Auto and Manual modes by pressing and holding the up arrow button․ The sight also features a magnification adjustment ring for variable power, enabling customization for different shooting scenarios․ These settings enhance accuracy and adaptability, ensuring optimal performance in both tactical and competitive environments․

Accessories and Upgrades

11․1 Recommended Accessories for Enhanced Performance

Enhance your Vortex Venom with Weaver/Picatinny mounts for secure firearm attachment․ Protective lens covers and optional magnifiers are also recommended for optimal performance and durability․

11․2 Upgrading the Sight for Specific Applications

Upgrade the Venom with specialized reticles or higher magnification lenses for tailored performance in hunting, tactical, or competitive shooting scenarios, ensuring versatility and precision in any situation․

Enhance your Vortex Venom Red Dot Sight with compatible Weaver/Picatinny mounts for secure firearm attachment․ Protective lens covers and anti-reflective filters are recommended to maintain clarity and prevent scratches․ Additionally, consider a lens cleaning kit for optimal maintenance and a magnifier for extended range capabilities, ensuring your optic performs at its best in any shooting scenario․

Upgrade your Vortex Venom Red Dot Sight with a magnifier for extended range precision or night vision compatibility for low-light operations․ Custom turrets and reticle upgrades can tailor the optic to specific shooting disciplines, such as hunting or tactical use․ These enhancements ensure the Venom adapts to your needs, optimizing performance for any shooting scenario or environment․

The Vortex Venom Red Dot Sight is a reliable and versatile optic, designed for quick target acquisition and durability, enhancing your shooting experience with precision and satisfaction every time․

12․1 Final Thoughts on the Vortex Venom Manual

This comprehensive manual provides users with essential insights and practical guidance for optimizing the Vortex Venom Red Dot Sight․ From installation to troubleshooting, it ensures a seamless experience, helping shooters unlock the optic’s full potential․ The detailed instructions and clear explanations make it an invaluable resource for both beginners and experienced users, ensuring optimal performance and reliability in the field․

12․2 Encouragement to Explore More Features

Take the time to explore the Venom’s advanced features, such as its adjustable brightness settings, reticle options, and durable construction․ Experiment with Auto and Manual modes to find your preferred setup․ The VIP Warranty ensures peace of mind, so don’t hesitate to push the optic to its limits․ Discover how the Venom’s versatility enhances your shooting experience and adapt it to your unique needs for optimal performance․


  • 0

wii operations manual for troubleshooting

Category : Manuals

This manual serves as a comprehensive guide for resolving common Wii issues, providing step-by-step solutions for troubleshooting, maintenance, and error codes. Available in PDF and on Wii U Console.

1.1 Overview of the Wii Console and Its Components

The Wii console is a compact gaming system designed for intuitive gameplay. Key components include the Wii Remote, Nunchuk, and Sensor Bar. The console features a disc drive for games and media, AV outputs for connectivity, and built-in channels for digital content. This guide provides detailed insights into each component, ensuring optimal performance and troubleshooting. Refer to the Wii Operations Manual for comprehensive details.

1.2 Importance of Regular Maintenance and Troubleshooting

Regular maintenance and troubleshooting are essential to ensure the Wii console operates smoothly. Dust buildup, worn-out components, and software glitches can hinder performance. Addressing issues promptly prevents hardware damage and ensures uninterrupted gaming. This manual provides guidance on identifying and resolving common problems, such as disc errors or connectivity issues, to maintain optimal functionality and extend the console’s lifespan.

Common Issues and Their Solutions

This section addresses frequent Wii problems, such as the console not turning on or the remote malfunctioning. It provides practical solutions and guidance from the manual to resolve these issues effectively.

2.1 Wii Console Not Turning On

If the Wii console doesn’t power on, ensure the power cord is securely connected to both the console and the electrical outlet. Check the outlet for functionality by testing it with another device. Verify the power button is functioning correctly. If issues persist, refer to the troubleshooting chapter in the manual or contact Nintendo Support for further assistance.

2.2 Wii Remote Not Responding or Freezing

If the Wii Remote isn’t responding or freezes, restart the console and resync the remote by removing its battery, waiting 10 seconds, and reinstalling it. Ensure there are no obstructions between the remote and Sensor Bar. Check for interference from other devices. If issues persist, refer to the troubleshooting section in the manual or contact Nintendo Support for assistance.

Disc-Related Problems

Disc issues often arise from improper loading, ejection, or damage. Ensure discs are clean, properly aligned, and free of scratches. Restart the Wii and try again. If problems persist, consult the manual or contact Nintendo Support for further assistance.

3.1 Disc Not Loading or Ejecting

If the Wii fails to load or eject a disc, ensure the console is turned off, then press and hold the eject button while turning it on; Clean the disc thoroughly and check for obstructions in the disc slot. If issues persist, refer to the troubleshooting guide or contact Nintendo Support for assistance.

3.2 Scratched or Damaged Discs

Scratched or damaged discs may fail to load or cause gameplay issues. Gently clean the disc with a soft cloth to remove dirt or smudges. Avoid harsh chemicals or abrasive materials. If the disc is severely damaged, it may need to be replaced. Ensure the Wii console is properly maintained to prevent further damage. Consult the manual for additional guidance or contact Nintendo Support if issues persist.

Controller and Accessories Troubleshooting

Address issues with Wii Remotes, Nunchuks, and Classic Controllers, such as connectivity problems or battery drain. Refer to specific sections for detailed solutions and maintenance tips.

4.1 Wii Remote Battery Issues

Identify and resolve battery-related problems with Wii Remotes, such as low power or drained cells. Replace batteries, check connections, or reset the remote if issues persist. Ensure proper storage to maintain battery health and performance. Refer to the manual for detailed troubleshooting steps and maintenance tips to prevent future issues.

4.2 Nunchuk or Classic Controller Connectivity Problems

Address connectivity issues with Nunchuk or Classic Controllers by resetting the Wii Remote, ensuring proper syncing, and checking for physical damage or corrosion. Consult the manual for detailed steps to resolve pairing problems or connectivity loss. If issues persist, contact Nintendo Support for further assistance or repair options.

Connectivity and Internet Issues

Troubleshoot Wi-Fi connectivity problems by resetting your router, checking network settings, and ensuring a stable connection. Address online gaming issues by verifying server status and updating software.

5.1 Unable to Connect to Wi-Fi

If your Wii fails to connect to Wi-Fi, restart your router and ensure it’s compatible with the Wii’s 802.11b/g standards. Check your network’s SSID and password, and verify that MAC filtering is disabled. Move the Wii closer to the router to improve signal strength. For further assistance, refer to the Wii Operations Manual or contact Nintendo support.

5.2 Online Gaming and Server Connection Problems

If you encounter issues with online gaming or server connections, ensure your Wii is connected to Wi-Fi and servers are active. Restart your router and check for any ongoing server maintenance. Verify your network settings and ensure your Wii’s system software is up-to-date. If problems persist, refer to the Wii Operations Manual or contact Nintendo support for further assistance.

Sensor Bar and Pointer Issues

Check sensor bar placement and ensure it’s clean. Verify Wii Remote calibration and pointer alignment. Refer to the manual for detailed troubleshooting steps and solutions.

6.1 Wii Remote Pointer Not Aligning Properly

If the Wii Remote pointer isn’t aligning correctly, check the sensor bar placement and ensure it’s clean. Verify the Wii Remote is calibrated properly; Adjust the sensor bar position if necessary and recalibrate the remote by following the manual’s instructions. Ensure no obstructions are blocking the sensor bar’s view. Refer to the troubleshooting guide for detailed steps to resolve pointer misalignment issues effectively.

6.2 Sensor Bar Not Functioning

If the sensor bar isn’t working, ensure it’s clean and properly connected. Check for obstructions and verify its placement above or below the TV. Power cycle the Wii console and test the remote pointer again. If issues persist, consider replacing the sensor bar. Refer to the manual for detailed troubleshooting steps to restore functionality and improve remote performance.

Sound and Video Problems

Address common issues like no sound, distorted audio, or video lag. Check connections, settings, and ensure proper display configurations. Restarting the console often resolves such problems.

7.1 No Sound or Distorted Audio

Check the TV volume and mute settings. Ensure the Wii’s audio settings are correct. Verify AV cable connections and inspect for damage. Restart the console to resolve distorted sound issues. If problems persist, refer to the troubleshooting guide for further diagnostic steps and potential solutions.

7.2 Video Lag or Poor Display Quality

Check AV cable connections and ensure they are secure. Verify the Wii’s video settings match your TV’s resolution. Restart the console and TV to resolve lag. If issues persist, inspect the cables for damage or try using a different AV port. Consult the manual for additional troubleshooting steps or contact Nintendo support for assistance.

Error Codes and Their Solutions

Refer to the manual’s troubleshooting chapter for common Wii error codes and solutions. Visit support.nintendo.com for detailed guides and contact customer service for unresolved issues.

8.1 Common Wii Error Codes

Common Wii error codes include issues like disc read errors, system file corruption, and connectivity problems. These codes, such as the “Unable to Read Disc” error, are addressed in the manual’s troubleshooting section. For unresolved issues, the manual directs users to Nintendo’s support website or customer service hotline for further assistance and solutions.

8.2 How to Resolve Error Codes

Resolving Wii error codes often involves restarting the console, updating system software, or cleaning the disc. For more severe issues, the manual suggests resetting the Wii to default settings or contacting Nintendo Support. Additionally, specific error codes may require re-syncing controllers or checking network connections for online-related problems, ensuring a smooth gaming experience through guided troubleshooting steps.

Advanced Troubleshooting Techniques

Advanced troubleshooting involves system resets, software updates, and reinstallation. These steps restore the Wii to its factory settings, addressing persistent issues and improving performance effectively.

9.1 Resetting the Wii Console

Resetting the Wii console can resolve software-related issues. Press and hold the Power button for 10 seconds to perform a hard reset. This restarts the system, clearing temporary data without affecting saved games or settings. For a factory reset, navigate to Settings > System Settings > System Update > Reset Settings.

9.2 Updating or Reinstalling System Software

To update or reinstall the Wii system software, access the Wii Menu and select ‘System Update.’ Follow the on-screen instructions to download and install the latest version. This process helps resolve software issues and improve performance without affecting saved games or settings.

Maintenance Tips to Prevent Future Issues

Regular cleaning of the Wii console and accessories prevents dust buildup. Store devices in a dry, cool place. Handle components gently to avoid damage.

10.1 Cleaning the Wii Console and Accessories

Regularly clean the Wii console and accessories to prevent dust buildup. Use a soft, dry cloth to wipe surfaces. Avoid harsh chemicals or liquids. For stubborn marks, dampen a cloth slightly but avoid moisture inside devices. Clean Wii Remotes with a soft cloth, focusing on buttons and sensors. Avoid using compressed air, which may damage internal components.

Official Wii Operations Manual

10.2 Proper Storage and Handling

Store the Wii console and accessories in a cool, dry place, away from direct sunlight and moisture. Use protective covers for devices when not in use. Handle components gently to avoid scratches or damage. Ensure discs are stored upright in cases. Avoid stacking heavy objects on top of the console or accessories. Proper storage extends the lifespan of your Wii system.

Seeking Professional Help

For unresolved issues, contact Nintendo Support at 1-800-255-3700 or visit support.nintendo.com. Authorized service centers can also assist with repairs and maintenance.

11.1 When to Contact Nintendo Support

Contact Nintendo Support for unresolved issues or severe damage. Visit support.nintendo.com or call 1-800-255-3700 for professional assistance with Wii troubleshooting, repairs, and maintenance.

11.2 Finding Authorized Service Centers

Visit Nintendo’s official support website to locate authorized service centers near you. These centers provide certified repairs and maintenance for Wii consoles and accessories, ensuring genuine parts and expert service. For assistance, call 1-800-255-3700 or refer to the Wii Operations Manual for additional guidance.

Regularly maintaining your Wii console and referencing the manual ensures optimal performance. For unresolved issues, contact Nintendo support or visit authorized service centers for professional assistance.

12.1 Summary of Key Troubleshooting Steps

Identify the issue and refer to the manual for specific solutions. Power cycle the console, clean components, and update software. For unresolved problems, reset the Wii or contact Nintendo support. Regular maintenance, proper storage, and prompt attention to errors ensure longevity and optimal performance of your Wii console and accessories.

12.2 Best Practices for Ongoing Wii Maintenance

Regularly clean the console, discs, and accessories to prevent dust buildup. Store the Wii in a cool, dry place away from direct sunlight. Handle components gently to avoid damage. Update system software periodically for optimal performance. Maintain proper battery care for remotes and accessories to ensure longevity and functionality.


  • 0

orbit timer instruction manual

Category : Manuals

Welcome to the Orbit Timer Instruction Manual! This guide provides essential information for understanding, installing, and operating your Orbit sprinkler timer effectively․ Learn how to set up programs, troubleshoot common issues, and optimize watering schedules for your lawn care needs․ Discover the key features and benefits of your Orbit timer, ensuring proper usage and maintenance for long-lasting performance․ This manual is your comprehensive resource for mastering your Orbit timer’s functionality and customization options․ Happy watering!

1․1 Understanding the Orbit Timer Models (62061Z, 58910, etc․)

The Orbit Timer models, such as 62061Z and 58910, offer distinct features for various irrigation needs․ Model 62061Z is known for its easy-to-use interface, while 58910 provides advanced scheduling options․ Each model is designed to cater to different lawn care requirements, ensuring flexibility and efficiency in watering systems․ Refer to your specific model for tailored instructions․

1․2 Importance of the Instruction Manual for Proper Usage

The instruction manual is essential for understanding and configuring your Orbit Timer correctly․ It provides detailed steps for setting up programs, troubleshooting common issues, and maintaining electrical safety․ By following the manual, you ensure optimal performance, prevent malfunctions, and maximize water efficiency․ Refer to it regularly for guidance tailored to your specific model․

Key Features of the Orbit Timer

The Orbit Timer offers easy programming, multiple watering programs, and flexible scheduling options․ It supports smart app integration, weather sensors, and customizable settings for efficient lawn care․

2․1 Overview of the Easy-Set Logic Technology

Orbit’s Easy-Set Logic Technology simplifies programming with an intuitive interface․ It combines simple setup with advanced features like multiple start times, watering intervals, and customization options․ This technology ensures efficient watering schedules while maintaining ease of use for all users․ Perfect for both beginners and experienced users, it streamlines the irrigation process effectively․

2․2 Multiple Program Settings (A, B, C Programs)

The Orbit Timer offers three independent programs (A, B, C), allowing you to customize watering schedules for different areas of your lawn․ Each program can have unique start times, durations, and frequencies, providing flexibility for diverse watering needs․ This feature ensures tailored irrigation for various landscapes, optimizing water usage efficiently․

2․3 Flexibility in Watering Schedules and Intervals

The Orbit Timer offers exceptional flexibility with customizable watering schedules and intervals․ Users can set multiple start times, durations, and frequencies for each program, ensuring precise watering control․ Interval mode allows watering at specific cycles, while cycle start times provide further customization․ This adaptability ensures efficient water usage and tailored irrigation for any landscape․

Programming the Orbit Timer

Programming the Orbit Timer involves setting the clock, assigning start times, and configuring watering duration and frequency․ This ensures precise control over your irrigation schedule for optimal results;

3․1 Setting the Clock and Initial Configuration

Begin by setting the clock on your Orbit Timer․ Turn the dial to “Set Clock,” press to select the hour, and confirm using the dial․ Adjust minutes and AM/PM settings similarly․ Once the clock is set, proceed to configure basic settings like watering programs and station assignments to prepare for scheduling․

3․2 Assigning Start Times for Each Program

Access the program menu and select the desired program (A, B, or C)․ Use the plus/minus buttons to set the start time, toggling between hours and minutes․ Confirm each step by pressing the dial․ Once all start times are set, the timer will activate according to your customized schedule․

3․3 Setting Watering Duration and Frequency

Set the watering duration for each station using the plus/minus buttons, selecting minutes․ Adjust frequency by choosing intervals (daily, every 2 days, etc․)․ Confirm settings by pressing the dial․ The timer will water according to these parameters, ensuring efficient and tailored irrigation for your landscape․ Customize as needed for optimal results․

3․4 Understanding Interval Mode and Cycle Start Times

Interval mode allows you to set how often watering occurs, such as every 2 or 3 days․ Cycle start times determine when the watering sequence begins․ Use the dial to select the interval (e․g․, daily, every 2 days) and set the start time using the plus/minus buttons․ This feature ensures consistent watering schedules tailored to your lawn’s needs․ Optimize water usage by adjusting these settings seasonally or based on weather conditions․ Proper configuration of interval mode and cycle start times is key to efficient irrigation management․ Ensure all stations adhere to the programmed schedule for uniform watering․ Regularly review and adjust these settings to maintain optimal watering performance and adapt to changing conditions․ This feature is especially useful for lawns with varying water requirements or for managing water conservation efforts effectively․ By customizing interval mode and cycle start times, you can achieve a balanced and efficient irrigation system that meets your specific needs․ This ensures your lawn receives the right amount of water at the right time, promoting healthy growth and minimizing waste․ Adjusting these settings is straightforward and can be done manually or through the B-hyve app for added convenience․ Explore the full potential of your Orbit timer by leveraging interval mode and cycle start times to create a personalized watering plan․ This advanced feature simplifies lawn care while ensuring your yard remains lush and well-maintained throughout the year․

Manual Operation of the Orbit Timer

Manual operation allows temporary adjustments without altering programmed schedules․ Use the manual run feature to test or activate stations instantly․ This mode ensures quick, easy control for immediate watering needs․

4․1 How to Manually Run a Station

To manually run a station, press the Manual button on the timer․ Select the desired station using the plus or minus buttons․ Choose the watering duration and press Start․ This feature allows temporary activation without changing programmed schedules, ensuring quick testing or immediate watering needs are met effortlessly․

4․2 Adjusting Settings Without Altering Scheduled Programs

Adjust settings without affecting scheduled programs by using the temporary override feature․ Press Menu, select Temporary Adjustments, and modify settings like watering duration or start times․ Changes are applied only once, preserving your programmed schedule for future use․ This feature offers flexibility without disrupting your existing watering plans․

4․3 Using the “Set Clock” and “Set Program” Features

To set the clock, press the menu button until “Set Clock” appears, then use the plus/minus buttons to adjust the hour and minutes․ Confirm with OK․ For programs, select “Set Program,” choose A, B, or C, and define start times, durations, and intervals․ Use the cycle start times for recurring schedules․ Adjust as needed without affecting other settings․ Save changes to apply them․

Troubleshooting Common Issues

Troubleshoot common issues like the timer not turning on by checking power connections․ Verify schedules for incorrect watering times․ Ensure wireless sensors are properly connected; Consult the manual or contact support for unresolved issues․

5․1 Timer Not Turning On or Responding

If the timer doesn’t turn on, check the power source and ensure all circuit breakers are on․ Verify connections are secure and free from corrosion․ If issues persist, reset the timer by unplugging it for 30 seconds․ Contact Orbit support if the problem remains unresolved․

5․2 Incorrect Watering Times or Intervals

If watering times or intervals are incorrect, check the clock settings and ensure AM/PM is correct․ Review programmed start times, duration, and frequency for accuracy․ Verify interval mode and cycle start times are properly configured․ Ensure the timer is set to “Auto” mode, not “Manual․” Adjust settings as needed to match your desired schedule․

5․3 Communication Problems with Wireless Sensors

For issues with wireless sensor communication, ensure the sensor is paired correctly with the timer․ Check for physical obstructions or interference from other devices․ Restart both the timer and sensor, and verify they are within range․ Refer to the sensor’s manual for specific pairing instructions and troubleshooting steps to restore connectivity․

Installation and Setup

Mount the timer securely near a power source, ensuring proper wiring connections․ Follow the included mounting scheme for accurate placement and valve connections to ensure reliable operation․

6․1 Mounting the Timer and Connecting Valves

Mount the timer on a flat surface near a power source using the provided screws․ Connect the valves securely, ensuring tight connections to prevent leaks․ Use the mounting scheme to mark drill holes accurately․ Ensure the timer is level and stable for proper operation and valve control functionality․

6․2 Wiring the Timer and Ensuring Proper Connections

Disconnect the power source before wiring․ Follow the color-coded wires for correct connections․ Securely attach wires to the timer and valves, ensuring tight connections․ Double-check wiring accuracy to avoid malfunctions․ Refer to the manual for specific wiring diagrams and safety guidelines to ensure proper installation and functionality of your Orbit timer system․

6․3 Placement Near a Power Source and Waterproofing

Mount the timer near a power source to minimize wiring․ Ensure the area is dry and protected from water exposure․ For outdoor use, install in a waterproof enclosure or cover․ Avoid direct sunlight and moisture to prevent damage․ Proper placement and waterproofing ensure long-term reliability and safe operation of your Orbit timer system․

Advanced Features of the Orbit Timer

Explore smart scheduling with the B-hyve app, enabling remote control and customized watering plans․ Integrate wireless rain sensors for weather-based adjustments and optimize water usage․ Customize programs for specific landscapes, ensuring efficient and tailored irrigation solutions․ These advanced features enhance functionality and convenience for modern lawn care management․

7․1 Using the B-Hyve App for Smart Scheduling

The B-hyve app offers seamless smart scheduling, allowing you to control your Orbit timer remotely․ Program watering schedules, monitor progress, and adjust settings from your smartphone․ Receive weather-based adjustments and notifications to optimize water usage․ This app integrates with your Orbit timer, providing a user-friendly interface for personalized irrigation management and efficient lawn care․

7․2 Integrating with Wireless Rain Sensors

Integrate your Orbit timer with wireless rain sensors for smart watering automation․ The sensor detects rainfall and communicates with the timer to skip unnecessary watering․ Follow the step-by-step guide to pair the sensor with your timer, ensuring water conservation and efficient irrigation․ This feature enhances your system’s intelligence and environmental responsiveness․

7․3 Customizing Programs for Specific Landscapes

Customize your Orbit timer programs to suit different landscape areas, ensuring optimal watering for lawns, gardens, and drip systems․ Adjust watering times, select specific days, and set multiple start times to cater to varying plant needs․ This feature allows you to optimize water usage based on soil type and plant water requirements, enhancing efficiency and plant health․

Safety Precautions and Maintenance

Ensure safe operation by following electrical guidelines and performing regular maintenance․ Protect the timer from water exposure, store it properly during winter, and avoid electrical hazards to maintain functionality and longevity․ Always refer to the manual for detailed safety and care instructions to prevent malfunctions and extend the product’s lifespan․ Regular checks and timely interventions are crucial for maintaining optimal performance and ensuring user safety․ By adhering to these precautions, you can enjoy reliable and efficient watering schedules throughout the year․ Proper storage and winterization procedures are essential to safeguard the timer during off-season periods․ Additionally, routine inspections of wiring and connections can help prevent unexpected issues, ensuring your Orbit timer continues to operate smoothly․ Remember to disconnect the power source before performing any maintenance tasks to avoid electrical shock․ Understanding and implementing these safety measures will not only protect your investment but also contribute to the overall health of your landscape․ Stay proactive with maintenance to get the most out of your Orbit timer․

8․1 Electrical Safety Tips

  • Always disconnect the power source before performing maintenance or repairs to avoid electrical shock․
  • Ensure the timer is installed near a GFCI-protected outlet to prevent ground faults․
  • Avoid exposing the timer to water or moisture, as this can lead to electrical hazards․
  • Never modify or tamper with the timer’s electrical components, as this may cause malfunctions or safety risks․
  • Keep children and pets away from the timer to prevent accidental electrical exposure․

8․2 Regular Maintenance to Prevent Malfunction

Regular maintenance ensures your Orbit timer operates smoothly․ Clean corrosion from terminals, check wiring connections, and replace worn-out batteries․ Inspect and replace faulty solenoids or valves․ Perform software updates if available․ Seasonally, drain and winterize the system to prevent freezing․ Schedule periodic checks to maintain optimal performance and extend lifespan․

8․3 Proper Storage and Winterization

Properly store your Orbit timer during the winter months to prevent damage․ Disconnect hoses, drain water from the system, and protect it from freezing temperatures․ Store the timer in a dry, cool place․ Ensure all connections are secure and consider checking for firmware updates before storage to maintain functionality․

Compliance and Certifications

The Orbit timer complies with UL-1951 standards and is CE approved for international models, ensuring safety and reliability․ It meets environmental regulations, promoting eco-friendly watering solutions․

9․1 UL-1951 Compliance

The Orbit timer is UL-1951 certified, ensuring it meets strict safety standards for electrical appliances․ This compliance guarantees reliable performance and protection against potential hazards, aligning with safety regulations for automatic sprinkler timers․ The certification underscores the product’s commitment to quality and user safety, providing peace of mind during operation․

9․2 CE Approval for International Models

Orbit timers designed for international markets carry CE approval, ensuring compliance with European safety and environmental standards․ This certification guarantees that the product meets rigorous requirements for safety, health, and environmental protection, making it suitable for use in EEA countries and providing assurance of quality and reliability for global customers․

9․4 Environmental Considerations

Orbit timers are designed with environmental responsibility in mind, promoting water conservation through efficient scheduling․ Features like automatic shut-off and rain sensor compatibility reduce water waste․ The timers are built with energy-efficient technology, aligning with sustainable practices․ Proper disposal and recycling of older models are encouraged to minimize environmental impact and support eco-friendly initiatives․

Customer Support and Resources

For assistance, contact Orbit Technical Service at 1-800-488-6156 or access online manuals, video tutorials, and FAQs through their official website for comprehensive support and troubleshooting guides․

10․1 Contacting Orbit Technical Service

For technical support, call Orbit Technical Service at 1-800-488-6156․ Representatives are available to assist with troubleshooting, programming, and general inquiries․ Visit the official website for additional contact options, ensuring prompt resolution to any issues with your Orbit timer or related products․

10․2 Accessing Online Manuals and Guides

Visit the official Orbit Irrigation Products website or ManualsLib to access digital manuals, quick start guides, and troubleshooting resources․ Manuals are available for models like 62061Z and 58910, ensuring easy access to instructions, specs, and programming details for your Orbit timer needs․

10․3 Video Tutorials and FAQs

Orbit offers video tutorials on platforms like YouTube and their official website, covering topics like programming and troubleshooting․ FAQs are available on ManualsLib and the Orbit site, addressing common issues and providing step-by-step solutions․ Additionally, the Orbit B-hyve app offers guided setup and scheduling assistance for optimal timer use․


  • 0

canon 5d mark iii user manual

Category : Manuals

Welcome to the Canon EOS 5D Mark III User Manual, your comprehensive guide to mastering this powerful DSLR camera. This manual provides detailed instructions on camera setup, shooting modes, and customization options to enhance your photography experience. Whether you’re a professional or an enthusiast, it offers essential insights to unlock the full potential of your EOS 5D Mark III.

Overview of the Camera and Its Importance

The Canon EOS 5D Mark III is a high-performance digital single-lens reflex camera designed for professional photographers and enthusiasts. It features a full-frame 22.3-megapixel CMOS sensor, delivering exceptional image quality with precise detail and dynamic range. Known for its durability and versatility, this camera is widely used in photography, filmmaking, and studio work. Its robust build, intuitive controls, and advanced features make it a cornerstone in the photography industry. The EOS 5D Mark III has become a benchmark for DSLR cameras, offering unparalleled performance in various shooting conditions. This camera’s significance lies in its ability to balance power and portability, making it a favorite among creatives worldwide. Its enduring popularity underscores its importance in the evolution of digital photography.

Key Features of the Canon EOS 5D Mark III

The Canon EOS 5D Mark III boasts a 22.3-megapixel full-frame CMOS sensor, delivering outstanding image quality with rich detail and vibrant colors. It supports continuous shooting at up to 6 frames per second and features an expandable ISO range of 100–102400, ensuring excellent low-light performance. The camera is equipped with a 61-point autofocus system, offering precise and fast subject tracking. It also supports Full HD video recording at 1080p with manual controls for enhanced creativity. A 3.2-inch LCD screen provides clear playback and menu navigation, while dual memory card slots allow for flexible storage options. Weather-sealing ensures durability in harsh conditions, and built-in HDR and multiple exposure modes further expand creative possibilities. These features make the EOS 5D Mark III a powerful tool for both still photography and videography, catering to professionals and enthusiasts alike.

How to Obtain the Canon EOS 5D Mark III User Manual

Access the Canon EOS 5D Mark III User Manual by visiting Canon’s official website. Download the free PDF guide and use Adobe Reader for easy viewing online.

Downloading the PDF Manual

To download the Canon EOS 5D Mark III User Manual, visit Canon’s official website and navigate to the support section. Locate the EOS 5D Mark III model and select the appropriate language. Click on the provided PDF link to open the download window. Choose “Save” to download the manual to your device, ensuring you have enough storage space. Once downloaded, open the file using Adobe Reader 6.0 or a newer version, as older versions may not support the file format. The manual is a comprehensive guide covering camera setup, advanced features, and troubleshooting tips. Ensure your browser has JavaScript enabled to proceed with the download smoothly. This PDF manual is a valuable resource for unlocking the full potential of your camera.

Accessing Additional Resources and Guides

Beyond the user manual, Canon EOS 5D Mark III users can access a wealth of additional resources to enhance their photography experience. Canon’s official website offers tutorials, software manuals, and quick start guides to help you master advanced features. Community forums and third-party websites provide troubleshooting tips, firmware updates, and user-generated content. For optimal viewing, ensure you have Adobe Reader 6.0 or later installed. Enable JavaScript in your browser to access download links seamlessly. Exploring these resources will empower you to unlock the camera’s full potential, from custom settings to professional photography techniques. Utilize these guides to resolve common issues and stay updated with the latest software enhancements for your EOS 5D Mark III.

Basic Camera Operations

Mastering the Canon EOS 5D Mark III begins with understanding its core functions. From initial setup to navigating menus, this section covers essential operations to get you started seamlessly.

First-Time Setup and Configuration

Setting up your Canon EOS 5D Mark III for the first time involves several key steps to ensure optimal performance. Start by charging the battery and inserting it into the camera. Next, install the memory cards, ensuring they are properly formatted for use. Turn on the camera and navigate through the initial setup menu to configure language, date, and time settings. Familiarize yourself with the autofocus and metering modes, starting with default settings that can be adjusted later. Set the image quality to RAW for maximum flexibility in post-processing. Adjust the ISO to 100 for minimal noise and use Auto White Balance initially. Explore the camera’s controls, including the mode dial and quick control dial, to understand their functions. Set up autofocus points using the joystick and enable wireless connectivity for easy photo transfer and remote control. Check and update the firmware to ensure the latest features and improvements. Finally, take test shots to fine-tune exposure and explore the menu system for custom settings; This comprehensive setup will help you maximize your photography experience with the EOS 5D Mark III.

Navigating the Camera Menu

Navigating the Canon EOS 5D Mark III menu system is straightforward once you understand its structure. Press the MENU button to access the menu, then use the cross keys or Quick Control Dial to scroll through options. The menu is divided into tabs, such as Shooting, AF, Playback, Set-up, and Custom Functions. Each tab contains related settings for camera operation.

Highlight desired options using the cross keys, then press SET to select. Use the Quick Control Dial to adjust values or scroll through lists. The INFO button provides additional details for selected settings. Customize the My Menu tab to store frequently used settings for quick access. This intuitive system allows you to efficiently adjust camera parameters to suit your photography needs.

Advanced Features and Customization

The Canon EOS 5D Mark III offers advanced customization options, allowing users to tailor camera settings to their preferences. Customize buttons, save personal shooting styles, and manage complex settings efficiently for enhanced control over your photography experience.

Understanding Autofocus and Metering Modes

The Canon EOS 5D Mark III features advanced autofocus and metering systems designed to deliver precise control over your photography. The autofocus system offers multiple modes, including One-Shot AF for stationary subjects, AI Servo AF for continuous tracking of moving subjects, and Manual Focus for precise control. Metering modes, such as Evaluative, Center-Weighted, and Spot, ensure accurate exposure by analyzing light levels across the scene or focusing on specific areas. The camera’s 61-point AF system and customizable AF preferences allow for tailored performance, while metering modes adapt to various lighting conditions. These tools enable photographers to capture sharp, well-exposed images with ease, making the EOS 5D Mark III a versatile choice for both professionals and enthusiasts.

Customizing Settings for Personalized Photography

The Canon EOS 5D Mark III allows photographers to tailor their shooting experience through customizable settings. Users can save up to three custom shooting profiles, optimizing settings like ISO, autofocus, and metering modes for specific scenarios. The Custom Functions menu provides advanced options, such as adjusting autofocus tracking sensitivity and specifying default metering modes. Additionally, the camera’s My Menu feature lets you add frequently used settings for quick access. These personalization options empower photographers to streamline their workflow and adapt the camera to their unique style, ensuring every shot aligns with their creative vision. By leveraging these tools, users can maximize the camera’s capabilities and achieve consistent, professional-quality results in any shooting environment.

Troubleshooting and Maintenance

The Canon EOS 5D Mark III user manual provides solutions for common issues, such as error messages, firmware updates, and sensor cleaning. Regular maintenance ensures optimal performance and longevity.

Common Issues and Solutions

The Canon EOS 5D Mark III user manual addresses various common issues photographers may encounter. For instance, error messages such as “Err 01” or “Err 70” often relate to firmware or lens compatibility problems, which can be resolved by updating the camera’s firmware. Another frequent issue is the camera freezing, which can be fixed by resetting the camera to its default settings or cleaning the sensor. Additionally, connectivity problems with Wi-Fi or memory cards can be resolved by formatting the memory card or resetting the camera’s network settings. The manual also provides guidance on resolving autofocus inaccuracies by calibrating lenses or adjusting settings. Regular sensor cleaning and updating software are emphasized to maintain optimal performance. These solutions ensure photographers can quickly troubleshoot and continue capturing high-quality images without interruption.

Updating Firmware and Software

Updating the firmware and software of your Canon EOS 5D Mark III is essential to ensure optimal performance and access to the latest features. The user manual provides step-by-step instructions for this process. Visit the official Canon website, download the latest firmware version, and copy it to a formatted memory card; Insert the card into the camera, navigate to the firmware update option in the menu, and follow the on-screen instructions. Ensure the camera is fully charged or use an AC adapter to avoid interruptions. After the update, restart the camera to apply the changes. Regularly checking for updates and installing them helps maintain camera functionality and compatibility with new lenses or accessories. This process is straightforward and ensures your camera stays up-to-date with the latest advancements in photography technology.

The Canon EOS 5D Mark III User Manual empowers photographers to master their camera’s capabilities, unlock its full potential, and elevate their photography skills to new heights. Refer to it often for guidance and inspiration in capturing exceptional images.

Maximizing Your Photography Experience with the Canon EOS 5D Mark III

To fully utilize the Canon EOS 5D Mark III, explore its advanced features and customization options. The camera’s 22.3-megapixel full-frame CMOS sensor and 61-point autofocus system ensure exceptional image quality and precision. Experiment with manual controls, creative shooting modes, and video capabilities to expand your creative possibilities. Regularly update firmware to access the latest enhancements and improvements. Additionally, take advantage of resources like the EOS Utility and Digital Photo Professional for streamlined post-processing. By mastering these tools and techniques, you can unlock the camera’s full potential and achieve professional-grade results in every shot. Refer to the user manual and online guides for detailed instructions and troubleshooting tips to enhance your photography journey.


  • 0

ambiano air fryer manual

Category : Manuals

Welcome to the Ambiano Air Fryer Manual, your comprehensive guide to mastering this innovative kitchen appliance. This manual provides detailed instructions, safety tips, and operational insights to help you make the most of your air fryer experience. Discover how to achieve crispy, healthier meals with ease using this cutting-edge cooking solution.

Overview of the Ambiano Air Fryer and Its Benefits

The Ambiano Air Fryer is a revolutionary kitchen appliance designed to offer a healthier alternative to traditional deep frying. Using rapid hot air circulation technology, it achieves crispy results with minimal oil. Its user-friendly interface, compact design, and versatile cooking options make it perfect for preparing a variety of delicious meals. This fryer not only enhances cooking efficiency but also promotes healthier eating habits without compromising on flavor.

Key Features and Parts of the Ambiano Air Fryer

The Ambiano Air Fryer features a sleek design with essential components like the insert, Cool-Touch handle, safety element, and digital control panel for easy operation and safety.

Insert

The insert is a crucial component of the Ambiano Air Fryer, designed for placing food during cooking. It features a non-stick coating to prevent food from sticking and ensure easy cleanup. Made from durable materials, the insert withstands high temperatures and is dishwasher-safe for added convenience. Proper use and maintenance of the insert are essential for optimal performance and longevity of your air fryer.

Fry Basket Handle (Cool-Touch Handle)

The Fry Basket Handle, also known as the Cool-Touch Handle, is designed for safe and easy removal of the basket during cooking. This ergonomic handle remains cool to the touch even at high temperatures, ensuring secure grip and preventing burns. Made from heat-resistant materials, it provides durability and comfort, making food retrieval effortless and stress-free. Regular cleaning is recommended to maintain hygiene and functionality.

Safety Element

The Safety Element is a critical feature designed to ensure safe operation of the Ambiano Air Fryer. It includes mechanisms such as automatic shut-off and thermal protection to prevent overheating. This feature guarantees the device turns off if it detects abnormal temperatures or malfunction. Additionally, it may include secure locking mechanisms to prevent accidental opening during cooking. These safety measures enhance user protection and ensure reliable performance while preparing meals.

Fry Basket Lock (Under the Safety Element)

The Fry Basket Lock is a crucial component located beneath the Safety Element, ensuring the basket remains securely in place during cooking. This mechanism prevents accidental opening and potential spills, enhancing safety and stability. It operates with a simple yet effective design, locking the basket firmly to maintain even air circulation for consistent results. The lock is easy to engage and disengage, providing a seamless cooking experience while prioritizing user safety and efficiency.

Air Intake Vent

The Air Intake Vent plays a vital role in the Ambiano Air Fryer’s operation by drawing in air essential for the Rapid Air Technology. This vent ensures proper airflow, allowing hot air to circulate evenly around the food for consistent cooking results. It also helps prevent overheating by maintaining a balanced air flow. Regular cleaning of the vent is recommended to avoid blockages and ensure optimal performance, guaranteeing your air fryer operates efficiently and delivers consistent results every time.

Air Outlet Vent

The Air Outlet Vent is designed to expel hot air from the Ambiano Air Fryer, ensuring efficient airflow and temperature regulation. Proper ventilation through this vent is crucial for maintaining optimal cooking performance and preventing overheating. Regular cleaning is essential to avoid blockages, which could disrupt airflow and impair the fryer’s functionality. Keep the vent clear to ensure consistent cooking results and prolong the appliance’s lifespan.

Display/Control Panel

The Display/Control Panel is the central interface for operating the Ambiano Air Fryer. It features touch-sensitive buttons and a digital display, allowing users to set temperatures, timers, and select preset programs. The panel includes indicators for power, cooking status, and temperature adjustments. Its intuitive design enables easy navigation through various cooking modes and settings, ensuring a seamless and user-friendly experience for achieving perfect frying results every time.

Installation and Setup

Unbox and prepare your Ambiano Air Fryer by placing it on a flat, heat-resistant surface. Ensure all parts are clean and dry before first use for optimal performance.

Unboxing and Initial Setup

Carefully unbox your Ambiano Air Fryer, ensuring all components are included and undamaged. Gently remove any packaging materials and protective covers. Thoroughly wash the fry basket and pan with warm soapy water, then dry them completely. Place the air fryer on a flat, heat-resistant surface, ensuring good airflow around the vents. Plug in the device and allow it to reach room temperature before first use. Refer to the manual for specific setup instructions.

Placement and Preparation for First Use

Place the Ambiano Air Fryer on a stable, heat-resistant surface, ensuring at least 10 cm of clearance around the vents for proper airflow. Avoid positioning it near walls or other appliances to prevent overheating. Before first use, wash the fry basket and pan with warm soapy water, rinse thoroughly, and dry completely. Ensure all parts are clean and free of packaging residue. Refer to the manual for any specific pre-use instructions to ensure optimal performance and safety.

Operating the Ambiano Air Fryer

Operating your Ambiano Air Fryer is straightforward. Use the touch-sensitive control panel to set temperatures and timers. Ensure proper airflow by placing the fryer on a stable surface, away from walls. Regularly clean the basket and pan to maintain performance and hygiene. Always refer to the manual for specific operational guidelines and troubleshooting tips to ensure safe and efficient cooking.

Basic Operation and Controls

The Ambiano Air Fryer features a user-friendly control panel with touch-sensitive buttons. To start, plug in the device and ensure the fry basket is securely locked. Use the digital display to set your desired temperature and timer. Press the Start/Stop button to begin cooking. The Adjust button allows you to navigate through settings or adjust cooking parameters. Preheating is automatic, and the fryer will notify you with a beep when preheated or when cooking is complete. Always ensure the basket is properly placed before operation for even air circulation.

Preheating and Cooking Modes

The Ambiano Air Fryer features an automatic preheating function for optimal cooking results. Select from preset modes like French Fries (18 minutes at 400°F) or Bacon (10 minutes at 400°F). Custom modes allow you to set specific temperatures (175°F-400°F) and times (1-60 minutes). Use the control panel to navigate settings, ensuring the basket is properly placed for even air circulation. A beep signals the end of preheating and cooking cycles, ensuring precise control over your meals.

Cooking Modes and Times

The Ambiano Air Fryer offers preset modes for common foods and customizable settings for temperature and cooking time to suit various recipes and preferences.

Default Settings for Common Foods

The Ambiano Air Fryer features preset settings for popular dishes, such as French fries (18 minutes at 400°F) and bacon (10 minutes). These default modes ensure optimal results with minimal effort. Additional presets include chicken, fish, and vegetables, each designed to deliver perfectly cooked meals. Users can rely on these settings for consistent outcomes, making the cooking process convenient and hassle-free.

Customizing Cooking Times and Temperatures

The Ambiano Air Fryer allows for easy customization of cooking times and temperatures, enabling you to tailor settings to your specific needs. Users can adjust the timer and temperature to suit various food types, ensuring optimal results. For delicate items, lower temperatures are recommended, while heartier foods may require higher settings. The manual provides guidelines for adjusting these parameters, helping you achieve perfectly cooked dishes every time.

Cleaning and Maintenance

Regularly clean the frying basket and pan with warm soapy water to remove food residue. Dry thoroughly after cleaning to maintain efficiency and prevent moisture buildup.

Proper Cleaning of the Frying Basket and Pan

Start by unplugging the air fryer. Remove the frying basket and pan, then wash them with warm soapy water using a soft sponge or brush for tough residue. Rinse thoroughly to remove all soap. Dry with a towel or air dry to prevent moisture buildup. Avoid abrasive cleaners to prevent scratching. Check if parts are dishwasher safe. Clean all components, including handles, to ensure optimal performance and hygiene. Regular cleaning maintains efficiency and prevents food residue buildup.

Drying and Storing the Air Fryer

After cleaning, ensure all parts are completely dry to prevent moisture buildup. Use a soft cloth to wipe down the exterior and interior. Allow the frying basket and pan to air dry or dry thoroughly with a towel. Store the air fryer in a cool, dry place, away from direct sunlight. Avoid stacking items on top of the air fryer to maintain its shape and functionality. Proper storage preserves performance and longevity.

Safety Precautions

Always keep children away. Avoid overheating by following the manual. Ensure proper ventilation. Never leave it unattended. Use oven mitts or tongs for handling.

Important Safety Tips for Usage

Always adhere to these safety guidelines to ensure safe operation. Avoid overheating by following recommended temperatures. Never leave the air fryer unattended while in use. Use oven mitts or tongs to handle hot baskets. Keep children away from the appliance. Ensure proper ventilation in the kitchen. Do not submerge the air fryer in water. Refer to the manual for specific safety instructions.

Troubleshooting Common Issues

If the air fryer doesn’t turn on, check the power connection and ensure it’s properly plugged in. For uneven cooking, shake the basket midway. If food sticks, lightly spray with oil. If the display malfunctions, reset the device by unplugging and replugging it. For noise issues, ensure the basket is aligned correctly. Refer to the manual for detailed solutions and contact support if problems persist.

Warranty and Support

Your Ambiano Air Fryer is backed by a manufacturer’s warranty covering manufacturing defects. Register your product for extended support and access dedicated customer service for any queries or issues.

Understanding the Warranty and Support Options

Your Ambiano Air Fryer is protected by a limited warranty covering manufacturing defects for a specified period. To activate, register your product online. The warranty excludes wear and tear or misuse. For inquiries, contact the dedicated customer support team via phone or email. Extended support options may be available. Refer to your user manual for full details on warranty terms and support resources to ensure optimal product performance and assistance when needed.

With the Ambiano Air Fryer Manual, you’ve unlocked the full potential of your appliance. From setup to advanced features, this guide ensures a seamless cooking experience. By following safety tips, cleaning routines, and warranty details, you’ll enjoy crispy, healthy meals for years. Explore the world of air frying with confidence, creating delicious dishes effortlessly. Happy cooking with your Ambiano Air Fryer!


  • 0

overhead door model 1026 owners manual

Category : Manuals

The Overhead Door Model 1026 is a reliable garage door opener featuring an AC motor, Solid T rail, and Intellicode rolling code technology for enhanced security. It offers a 5-year motor warranty and 1-year parts warranty, ensuring durability and peace of mind. Designed for homeowner convenience, it supports smart integration and is compatible with Remootio Wi-Fi and Bluetooth accessories for smartphone control. This model combines affordability with advanced functionality, making it a popular choice for residential use.

1.1 Overview of the Garage Door Opener

The Overhead Door Model 1026 is a dependable garage door opener designed for residential use. It features a 1/2 HP AC motor operating on 110VAC, with a Solid T rail style for smooth operation. The opener includes Intellicode rolling code technology for enhanced security and is compatible with smart accessories like Remootio for smartphone control. It offers a 5-year motor warranty and 1-year parts warranty, ensuring long-term reliability and performance.

1.2 Importance of the Owner’s Manual

The owner’s manual for the Overhead Door Model 1026 is essential for proper installation, operation, and maintenance. It provides detailed instructions, safety guidelines, and troubleshooting tips to ensure optimal performance. The manual also outlines warranty details and offers guidance for programming remotes and integrating smart technology. Referencing the manual helps users maximize the opener’s features and address issues efficiently, ensuring long-term reliability and safety.

Product Features and Specifications

The Overhead Door Model 1026 features a 1/2 HP AC motor, Solid T rail system, and Intellicode rolling code technology. It operates on 110VAC without battery backup, ensuring reliable performance and enhanced security.

2.1 Motor Type and Rail Style

The Overhead Door Model 1026 is equipped with a powerful 1/2 HP AC motor, known for its durability and smooth operation. It utilizes a Solid T rail system, which provides stability and quiet performance. The motor operates on 110VAC power, ensuring consistent functionality without the need for a battery backup. This combination delivers reliable and efficient garage door operation for homeowners.

2.2 Security Features and Technology

The Model 1026 incorporates Intellicode rolling code technology, enhancing security by generating unique codes with each use. This prevents unauthorized access and ensures safe operation. Additionally, the opener is compatible with smart accessories like Remootio, allowing smartphone control through Wi-Fi and Bluetooth. These features provide advanced security and convenience for modern homeowners, safeguarding their property effectively.

Installation Guide

The Model 1026 installation requires assembling components, securing the rail, and connecting electrical systems. Ensure proper alignment and tension for smooth operation and safety.

3.1 Pre-Installation Requirements

Before installing the Overhead Door Model 1026, ensure the garage door is balanced and properly aligned. Verify all components are included and undamaged. Check the door’s spring tension and adjust if necessary. Ensure the ceiling joists are sturdy to support the opener’s weight. The door must be at least 5 feet high to prevent small children from reaching the wall button. Ensure the safety beam sensor is correctly aligned during installation to prevent accidents.

3.2 Step-by-Step Installation Process

Begin by unpacking and preparing all components. Assemble the rail and motor unit, ensuring proper alignment. Attach the rail to the garage door using provided brackets. Mount the opener on the ceiling, securing it firmly. Connect the chain or belt to the door and opener. Install the wall button and safety sensors, ensuring they are aligned correctly. Finally, test the door’s operation to confirm smooth and safe functionality.

Troubleshooting Common Issues

Common issues include the door not opening, remote malfunctions, and sensor misalignment. Check power supply, ensure sensors are clean and aligned, and test remote batteries. Resetting the opener may resolve operational issues. Refer to the manual for detailed diagnostic steps and solutions to restore functionality efficiently.

4.1 Diagnosing Common Problems

Identify issues by observing symptoms like erratic operation or non-response. Check power supply, sensor alignment, and remote batteries. Ensure safety beams are unobstructed and properly aligned. Consult the manual for troubleshooting charts to pinpoint faults. If problems persist, contact Overhead Door Consumer Connection at 1.800.029.3567 for expert assistance and parts. Regular maintenance can prevent many common issues.

4.2 Resetting the Garage Door Opener

To reset the Model 1026, first disconnect power and wait 30 seconds. Locate the learn button on the motor unit. Press and hold it until the indicator light flashes. Release and reconnect power. Reprogram all remotes and the wall button following the manual’s instructions. If issues persist, contact Overhead Door Consumer Connection for assistance. Ensure safety precautions are followed during the process.

Maintenance Tips for Longevity

Regular lubrication of moving parts, inspection of door springs, and cleaning of safety sensors ensure smooth operation. Schedule annual professional maintenance for optimal performance and longevity.

5.1 Regular Maintenance Tasks

Perform regular checks on the garage door balance and spring tension to ensure proper operation. Inspect the rail for debris and clean it as needed. Lubricate moving parts annually, excluding the belt if equipped. Check the safety beam sensor for alignment and cleanliness; Tighten any loose hardware and verify all connections are secure. Schedule professional inspections every 12–18 months to maintain optimal functionality and safety.

5.2 Lubricating Moving Parts

Lubricate the hinges, rollers, and springs annually with a silicone-based spray to ensure smooth operation. Avoid using grease, as it attracts dust. Apply lubricant sparingly to prevent residue buildup. For belt-driven models, do not lubricate the belt. Regular lubrication extends the lifespan of moving components and maintains quiet, efficient performance. Always refer to the manual for specific lubrication points and recommendations.

Remote Control and Wall Button Operation

The Overhead Door Model 1026 operates seamlessly with its remote control and wall button, offering convenient and reliable access. The Intellicode rolling code technology ensures secure communication between devices, preventing unauthorized access. The remote control, part 37157R, is compatible with the opener and easy to program for hassle-free operation.

6.1 Programming the Remote Control

Programming the remote control for the Overhead Door Model 1026 is straightforward. First, locate the “Learn” button on the opener, press and release it, then immediately press the remote button you wish to program. The opener will recognize the signal, ensuring secure communication via Intellicode technology. Repeat for additional remotes if needed. The compatible remote control (part 37157R) ensures reliable operation and enhanced security.

6.2 Troubleshooting Remote Issues

If the remote control isn’t working, check the battery strength and ensure it’s properly aligned with the opener. Verify the remote is programmed correctly by pressing the “Learn” button on the opener and then the remote button. If issues persist, ensure no physical obstructions are blocking the signal. For unresolved problems, consult the manual or contact Overhead Door customer support for assistance.

Smart Technology Integration

The Overhead Door Model 1026 is compatible with Remootio Wi-Fi and Bluetooth accessories, enabling smartphone control. This integration allows users to operate their garage door remotely, enhancing convenience and monitoring capabilities.

7.1 Compatibility with Smart Systems

The Overhead Door Model 1026 is compatible with Remootio Wi-Fi and Bluetooth smart gate opener accessories. This integration allows seamless control of the garage door via a smartphone app, offering remote operation and monitoring. The system enhances convenience and security without requiring complex wiring. Compatibility ensures the opener works efficiently with modern smart home systems, providing users with advanced functionality and ease of use.

7.2 Setting Up Smartphone Control

To set up smartphone control for the Overhead Door Model 1026, install the Remootio app and connect the Wi-Fi/Bluetooth accessory. Ensure the opener is compatible and the accessory is powered. Open the app, select the device, and follow pairing instructions. Test the door’s response to ensure proper connectivity. This setup allows remote operation, monitoring, and integration with smart home systems for enhanced convenience and security.

Safety Features and Precautions

The Overhead Door Model 1026 includes a safety beam sensor to prevent accidents and child safety features. Ensure the wall button is installed at least 5 feet high to prevent child access, enhancing overall safety and compliance with security standards.

8.1 Safety Beam Sensor Functionality

The Overhead Door Model 1026 features a safety beam sensor that emits infrared beams across the garage door opening. If an object obstructs the beam, the sensor detects it, stopping the door from closing and potentially preventing accidents. This automatic reversal feature is crucial for safeguarding people, pets, and property. Proper installation and maintenance ensure the sensor functions correctly, providing reliable safety and peace of mind for homeowners.

8.2 Child Safety Considerations

The Overhead Door Model 1026 emphasizes child safety with features like the safety beam sensor, which prevents accidents by detecting obstructions. Parents should ensure the wall button is installed at least 5 feet high to prevent children from accessing it. Keeping remote controls out of reach and educating children about garage door hazards are also crucial. Regular maintenance and proper function checks ensure the door operates safely and securely.

Warranty Information

The Overhead Door Model 1026 includes a 5-year warranty on the motor and 1-year coverage for other parts. Registration is required for warranty validation. Contact customer service at 1.800.029.3567 for assistance.

9.1 Coverage Details

The Overhead Door Model 1026 warranty includes 5 years of coverage for the motor and 1 year for the remaining opener parts. Warranty terms apply to defects in materials and workmanship. Proper registration is required to validate the warranty. For inquiries or claims, contact Overhead Door Consumer Connection at 1.800.029.3567. Ensure all installations and maintenance adhere to the manual’s guidelines to maintain warranty eligibility.

9.2 Registering Your Product

Register your Overhead Door Model 1026 to ensure warranty validation and access to exclusive support services. Visit the official Overhead Door website or contact their Consumer Connection at 1.800.029.3567. Provide your product details, purchase date, and personal information to complete the registration. Proper registration ensures seamless warranty claims and enhanced customer support experiences. It is a quick and straightforward process that protects your investment.

Customer Support and Resources

Contact Overhead Door’s Consumer Connection at 1.800.029.3567 for expert assistance. Representatives are available Monday-Friday, 8:00 a.m. to 11:00 p.m. Eastern Time to address your concerns.

10.1 Contacting Customer Service

For assistance, contact Overhead Door’s Consumer Connection at 1.800.029.3567. Trained representatives are available Monday-Friday, 8:00 a.m. to 11:00 p.m. Eastern Time. They provide expert support for troubleshooting, repairs, and parts. Whether you need help with DIY fixes or professional service, their team ensures prompt resolution. This service is designed to make operating and maintaining your Overhead Door Model 1026 hassle-free and efficient.

10.2 Downloading the Owner’s Manual

The owner’s manual for the Overhead Door Model 1026 is available for free download in PDF format. Visit the official website or authorized portals to access the manual, which covers installation, operation, and troubleshooting. The file, named overhead_stardard_om.pdf (8.95 MB), requires Acrobat 10 or higher. This resource ensures convenient access to essential information for optimal use and maintenance of your garage door opener.


  • 0

android 12 car stereo user manual pdf

Category : Manuals

Welcome to the Android 12 Car Stereo User Manual! This guide helps you master your car stereo system, featuring touchscreen navigation, Bluetooth connectivity, and Android Auto integration. Discover installation steps, customization options, and troubleshooting tips to enhance your driving experience. Explore advanced features and optimize your stereo for seamless entertainment and navigation on the go.

Overview of Android 12 Car Stereo Features

The Android 12 Car Stereo offers a robust infotainment system with a touchscreen interface, Android Auto integration, and Bluetooth connectivity. It supports multimedia playback, GPS navigation, and FM/AM radio tuning. Customizable home screens and app launchers enhance usability. Designed for seamless smartphone integration, it ensures hands-free calls and messaging. With regular updates and compatibility checks, it provides a modern, user-friendly driving experience optimized for safety and entertainment.

Importance of the User Manual for Optimal Usage

The user manual is essential for unlocking your Android 12 Car Stereo’s full potential. It provides step-by-step installation guides, feature explanations, and troubleshooting solutions. By understanding compatibility requirements and customization options, users can avoid common issues and ensure smooth operation. The manual empowers drivers to utilize advanced functionalities confidently, enhancing both safety and entertainment while on the road.

Installation and Setup

Begin by ensuring compatibility with your vehicle and carefully following the installation guide. Professional help is recommended for wiring and connectivity to avoid complications.

Pre-Installation Requirements and Compatibility Check

Before installing, ensure your vehicle’s electrical system and dashboard size are compatible with the Android 12 Car Stereo. Verify power requirements and steering wheel control compatibility. Check if the stereo supports your car’s make and model year. Download the latest firmware and update your phone book for seamless integration. Professional installation is recommended to avoid wiring errors and ensure proper functionality.

Step-by-Step Installation Guide for Android 12 Car Stereo

Begin by disconnecting the car battery to prevent electrical shocks. Remove the old stereo and connect the wiring harness to the new Android 12 unit. Secure the stereo in the dashboard and reconnect the battery. Power on and follow the on-screen setup guide. Connect Bluetooth, sync contacts, and install necessary apps for optimal functionality. Ensure all features are tested before finalizing the installation for a smooth user experience.

Wiring and Connectivity Instructions

Connect the power wire to the car’s ignition and ground wire to the vehicle’s chassis. Link the speaker wires to the car’s audio system. Ensure the USB and AUX ports are securely connected for media playback. For Bluetooth, pair the stereo with your phone. Connect the GPS antenna for navigation and AM/FM tuner for radio reception. Verify all connections are secure to avoid signal loss or interference during operation.

Understanding the User Interface

The Android 12 Car Stereo features an intuitive interface with clear icons, menus, and customizable layouts. Familiarize yourself with the touchscreen controls, voice commands, and essential buttons for seamless navigation and media management.

Navigating the Android 12 Car Stereo Dashboard

The Android 12 Car Stereo dashboard offers a user-friendly interface with a clean layout. Access music, navigation, and apps from the home screen. Use voice commands or touchscreen gestures for easy control. Customize shortcuts and rearrange icons to suit your preferences. The dashboard also displays essential information like time, signal strength, and battery status. Explore menus by swiping or tapping to discover more features and settings for a personalized experience.

Customizing the Home Screen forEase of Use

Customize your Android 12 Car Stereo home screen by adding frequently used apps or functions as shortcuts. Rearrange icons or widgets to prioritize your most-used features. Long-press the screen to enter edit mode and drag items to your preferred positions. You can also adjust themes, wallpapers, and button layouts for a personalized look. This ensures easy access to navigation, music, and calls, enhancing your driving experience while minimizing distractions.

Connectivity Options

The Android 12 Car Stereo offers versatile connectivity options, including Bluetooth pairing, Android Auto integration, and FM/AM radio tuning, ensuring seamless entertainment and navigation on the go.

Bluetooth Pairing and Troubleshooting

Pairing your device with the Android 12 Car Stereo is straightforward. Enable Bluetooth on your phone, locate the stereo’s name in available devices, and confirm pairing. If issues arise, restart both devices, ensure Bluetooth is enabled, and check for software updates. Troubleshooting tips include clearing paired devices, resetting the stereo, and verifying stable connections for uninterrupted audio streaming.

Android Auto Integration and Setup

Android Auto seamlessly integrates your Android device with the car stereo, enabling voice commands, Google Maps navigation, and app control. To set up, enable Android Auto in developer settings, connect your phone via USB, and select Android Auto on the stereo. Ensure your phone is compatible and USB debugging is enabled. Troubleshoot by restarting devices or checking USB connections for a stable link.

FM/AM Radio Tuning and Preset Management

Tune into your favorite FM/AM radio stations effortlessly. Use the stereo’s dial or touch interface to scan frequencies. Save up to 18 FM and 12 AM presets for quick access. Adjust the antenna for better signal strength. Organize presets by priority or alphabetical order for convenient listening. Troubleshoot weak signals by relocating the antenna or checking for interference sources.

Multimedia Features

Enjoy seamless playback of audio and video files, supported by various formats like MP3, WAV, and more. Access apps through the built-in launcher for enhanced entertainment.

Playing Audio and Video Files

Your Android 12 car stereo supports a wide range of audio and video formats, including MP3, WAV, and MP4. Easily play files via USB, Bluetooth, or microSD card.
Access your media library directly through the touchscreen interface, with options to sort and categorize files for quick access.
Customize playback settings like EQ and volume for an enhanced listening experience.
For video playback, connect to your car’s screen and enjoy content safely while parked.
This feature ensures seamless entertainment on the go, with intuitive controls designed for driver convenience.

Using the Built-In App Launcher

The Android 12 car stereo features a built-in app launcher, allowing easy access to installed applications. Navigate through apps using the touchscreen or voice commands for hands-free control.
Organize apps into folders or set favorites for quick access.
The launcher supports split-screen mode, enabling multitasking between navigation and media.
Regularly update apps via the Google Play Store for optimal performance.
Customize the app layout to suit your preferences for a personalized experience.

Navigating the Navigation System

Set up GPS for accurate directions. Use voice commands for hands-free navigation. Access real-time traffic updates and optimize your route. Search points of interest and ensure maps are updated regularly for the best experience.

Setting Up and Using GPS Navigation

To set up GPS navigation, access the navigation app from the home screen. Ensure location services are enabled in settings. Enter your destination using voice commands or manual input. Review the suggested route and start navigation. Use spoken commands for hands-free control. Save favorite locations for quick access. Regularly update maps for the latest routes and accuracy. Adjust settings like voice volume and route preferences for a personalized experience.

Optimizing Navigation Settings for Better Performance

Update maps regularly for the latest routes and accuracy. Enable voice commands for hands-free navigation. Adjust routing preferences, such as avoiding toll roads or highways. Use battery-saving modes to optimize performance without compromising navigation. Ensure screen brightness and timeout settings are configured to prevent overheating. Customize voice guidance volume and language for clearer directions. These tweaks enhance your GPS experience, ensuring reliable and efficient navigation on every journey.

Phone Integration and Contacts

Seamlessly integrate your phone with the Android 12 Car Stereo. Sync contacts, manage calls, and access messages directly through the stereo interface. Enhance your driving experience with convenient phone connectivity and hands-free controls for safety and efficiency while on the road.

Syncing Contacts and Phonebook

Syncing your phone’s contacts with the Android 12 Car Stereo ensures easy access to your phonebook while driving. To sync, go to the phonebook or SIM card interface and click the download button. The system will transfer contacts, allowing you to browse and call with ease. Organize contacts into favorites for quick access and ensure your phonebook is up-to-date for seamless integration. Regularly sync to maintain current contacts and enjoy hands-free calling and messaging capabilities.

Handling Calls and Messages via the Stereo

The Android 12 Car Stereo allows seamless handling of calls and messages. Receive and make calls using voice commands or the touchscreen interface. View incoming messages and reply using voice-to-text functionality. The system integrates with your phonebook, enabling quick access to contacts. Use steering wheel buttons for hands-free control, ensuring safe and convenient communication while driving. This feature enhances connectivity and driving safety, keeping you focused on the road.

Advanced Settings and Customization

Explore advanced settings to personalize your Android 12 Car Stereo experience. Customize display settings, audio equalizers, and user profiles for a tailored experience, ensuring optimal performance and convenience.

Updating the System Firmware

Regularly updating your Android 12 Car Stereo’s firmware ensures access to the latest features, bug fixes, and performance improvements. To update, connect to Wi-Fi, go to Settings > System > System Update, and follow on-screen instructions. Always backup your settings before proceeding to avoid data loss. Updates may enhance compatibility with Android Auto and Bluetooth devices, improving overall functionality and user experience.

Backing Up and Resetting the Stereo

Before resetting your Android 12 Car Stereo, backup your settings, contacts, and playlists. Go to Settings > System > Backup & Reset. Select “Backup My Data” and choose a storage method. Resetting restores default settings, erasing all stored data. Ensure all important information is saved externally. This process is useful for troubleshooting or preparing the stereo for a new user, maintaining optimal performance and functionality.

Tips and Tricks for Optimal Use

Regularly update your stereo’s software for enhanced security and performance. Organize apps on the home screen for quick access. Adjust display settings for better visibility during daylight or night driving. Use voice commands for hands-free control. Explore hidden features like customizable shortcuts to streamline your experience and maximize efficiency on the road.

Improving Performance and Battery Life

Regularly update your stereo’s software to enhance performance and security. Close unused apps to free up memory and improve responsiveness. Adjust screen brightness and timeout settings to conserve battery life. Use wired connections instead of Bluetooth for power-efficient media playback. Clear cache periodically to maintain optimal functionality. Enable the startup manager to prevent unnecessary apps from launching, optimizing boot time and overall efficiency.

Hidden Features and Shortcuts

Discover the hidden features of your Android 12 Car Stereo, like customizable gesture controls and voice command shortcuts for hands-free navigation. Use the quick-access menu by swiping down on the home screen to toggle settings swiftly. Enable developer mode for advanced customization options, and explore the built-in Equalizer+ app for enhanced audio tuning. These shortcuts enhance functionality and elevate your driving experience.

Troubleshooting Common Issues

Identify and resolve common issues like connectivity problems or audio glitches by restarting the system, checking wiring, and updating software. Consult the manual for detailed solutions and contact support if issues persist for optimal functionality.

Resolving Connectivity Problems

To resolve connectivity issues, restart the stereo and ensure Bluetooth is enabled on both the stereo and your device. Check pairing settings, verify physical connections, and update firmware. Reset the system if problems persist. Consult the manual for detailed troubleshooting steps to restore functionality and ensure seamless connectivity for optimal performance.

Fixing Audio and Video Playback Issues

To resolve audio or video playback issues, restart the stereo and ensure all connections are secure. Check file formats for compatibility and update the media player app. Disable and re-enable Bluetooth or USB connections. Resetting the stereo to factory settings may also resolve persistent issues. Refer to the manual for specific troubleshooting steps to restore smooth multimedia performance.

Thank you for following this guide! Mastering your Android 12 Car Stereo unlocks enhanced driving experiences. Explore features, optimize settings, and troubleshoot with confidence. Happy driving!

Final Thoughts on Mastering the Android 12 Car Stereo

With this guide, you’re now equipped to maximize your Android 12 Car Stereo’s potential. From touchscreen navigation to Bluetooth and Android Auto, explore features with confidence. Customize settings, troubleshoot issues, and enjoy seamless connectivity for an enhanced driving experience. Discover hidden features, optimize performance, and stay updated for the best results. Happy driving and exploring!

Encouragement to Explore More Features

Take the time to explore your Android 12 Car Stereo’s advanced features, such as customizable home screens, app integration, and connectivity options. Discover hidden shortcuts and optimize settings for a personalized experience. Regularly update your system to unlock new functionalities and enhance performance. Experiment with navigation, multimedia, and phone integration to make every drive more enjoyable and convenient. Keep exploring to get the most out of your stereo!